Lexus ES: Relay
On-vehicle Inspection
ON-VEHICLE INSPECTION
PROCEDURE
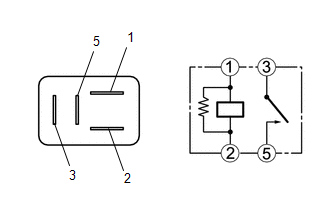
1. INSPECT WIPER RELAY
| (a) Measure the resistance according to the value(s) in the table below. Standard Resistance:
If the result is not as specified, replace the WIPER relay. |
|
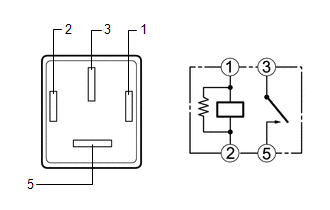
2. INSPECT WASHER RELAY
| (a) Measure the resistance according to the value(s) in the table below. Standard Resistance:
If the result is not as specified, replace the WASHER relay. |
|
READ NEXT:
 Components
COMPONENTS ILLUSTRATION *1 LEVEL WARNING SWITCH ASSEMBLY - -
Removal
REMOVAL CAUTION / NOTICE / HINT The necessary procedures (adjustment, calibration, initialization or registration) that must be performed after parts are removed and installed, or replaced during leve
SEE MORE:
Internal Control Module Software Incompatibility Not Programmed (U030051)
DESCRIPTION The forward recognition camera receives vehicle information from the ECM via CAN communication. DTC U030051 is stored when the vehicle information from the ECM cannot be confirmed. DTC No. Detection Item DTC Detection Condition Trouble Area U030051 Internal Control Module
PBD/PTL Pulse Sensor (B2222,B2225)
DESCRIPTION DTC B2222 is output when there is a malfunction in the door pulse sensor system inside the luggage closer motor assembly and a normal waveform is not input to the door pulse sensor during a power trunk lid operation. Also, this DTC is output when there is a malfunction in the power trunk
