Lexus ES: Reassembly
REASSEMBLY
PROCEDURE
1. INSTALL REAR SPOILER SUB-ASSEMBLY (w/ Rear Spoiler)
Click here .gif)
2. INSTALL LICENSE PLATE LIGHT ASSEMBLY LH
Click here
3. INSTALL LICENSE PLATE LIGHT ASSEMBLY RH
HINT:
Use the same procedure as for the LH side.
4. INSTALL TELEVISION CAMERA ASSEMBLY WITH WIRE
Click here
5. INSTALL LUGGAGE ELECTRICAL KEY SWITCH
Click here
6. INSTALL LUGGAGE COMPARTMENT DOOR OUTSIDE GARNISH SUB-ASSEMBLY
Click here
7. INSTALL REAR LIGHT ASSEMBLY LH
Click here
8. INSTALL REAR LIGHT ASSEMBLY RH
HINT:
Use the same procedure as for the LH side.
9. INSTALL HOLE PLUG
| (a) Install 2 new hole plugs. |
|
.png)
10. INSTALL LUGGAGE COMPARTMENT DOOR CUSHION
| (a) Engage the 8 claws to install 2 new luggage compartment door cushions. |
|
.png)
11. INSTALL LUGGAGE COMPARTMENT DOOR LOCK CYLINDER ASSEMBLY
| (a) Install the luggage compartment door lock cylinder assembly with the 2 nuts. Torque: 5.5 N·m {56 kgf·cm, 49 in·lbf} |
|
.png)
12. INSTALL LUGGAGE LOCK CONTROL CABLE CLAMP
| (a) Engage the guide and 2 claws to install the luggage lock control cable clamp. |
|
.png)
13. INSTALL LUGGAGE COMPARTMENT DOOR LOCK ASSEMBLY (w/o Power Trunk Lid System)
Click here
14. INSTALL LUGGAGE DOOR CLOSER ASSEMBLY (w/ Power Trunk Lid System)
Click here
15. INSTALL LUGGAGE COMPARTMENT KEY CYLINDER PROTECTOR
Click here
16. INSTALL LUGGAGE COMPARTMENT DOOR INSIDE HANDLE
Click here
17. INSTALL DOOR CONTROL SWITCH (w/ Power Trunk Lid System)
Click here
18. INSTALL LUGGAGE COMPARTMENT DOOR HINGE COVER LH
| (a) Engage the 3 clips to install the luggage compartment door hinge cover LH. |
|
.png)
19. INSTALL LUGGAGE COMPARTMENT DOOR HINGE COVER RH
HINT:
Use the same procedure as for the LH side.
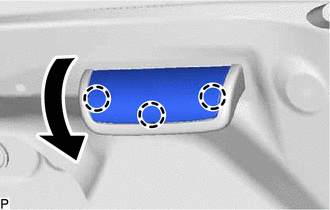
20. INSTALL LUGGAGE COMPARTMENT DOOR ASSIST GRIP
| (a) Install the luggage compartment door assist grip with the 2 screws. |
|
.png)
| (b) Engage the 3 claws as shown in the illustration. |
|
21. INSTALL LUGGAGE COMPARTMENT DOOR COVER
| (a) Install the luggage compartment door cover with the 14 clips. |
|
.png)
22. INSTALL SWITCH BEZEL (w/ Power Trunk Lid System)
(a) Engage the 2 claws to install the switch bezel as shown in the illustration.
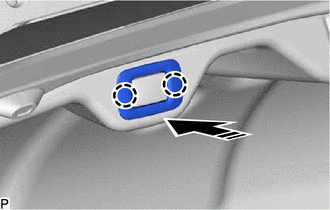
.png) | Install in this Direction |
23. INSTALL LUGGAGE LOCK CONTROL CABLE PLATE
(a) Engage the 2 claws to install the luggage lock control cable plate as shown in the illustration.
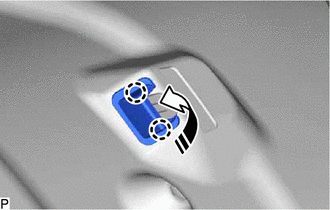
| | Install in this Direction |
24. INSPECT LUGGAGE DOOR CLOSER SYSTEM (w/ Power Trunk Lid System)
for HV Model:
Click here
for Gasoline Model:
Click here
25. PERFORM CALIBRATION (w/ Parking Assist Monitor System)
for HV Model:
Click here
for Gasoline Model:
Click here
26. PERFORM CALIBRATION (w/ Panoramic View Monitor System)
for HV Model:
Click here
for Gasoline Model:
Click here
READ NEXT:
 Luggage Compartment Door Closer Switch
ComponentsCOMPONENTS ILLUSTRATION *1 DOOR CONTROL SWITCH *2 LUGGAGE COMPARTMENT DOOR COVER *3 LUGGAGE LOCK CONTROL CABLE PLATE *4 SWITCH BEZEL RemovalREMOVAL PROCEDURE 1. REMO
Components
COMPONENTS ILLUSTRATION *1 COWL SIDE TRIM BOARD LH *2 FRONT DOOR OPENING TRIM COVER LH *3 FRONT DOOR SCUFF PLATE LH *4 INSTRUMENT SIDE PANEL LH *5 LOWER INSTRUMENT PANEL FINI
SEE MORE:
Purge Valve
ComponentsCOMPONENTS ILLUSTRATION *1 PURGE VALVE (PURGE VSV) *2 NO. 1 FUEL VAPOR FEED HOSE *3 NO. 2 FUEL VAPOR FEED HOSE - - N*m (kgf*cm, ft.*lbf): Specified torque - - RemovalREMOVAL PROCEDURE 1. REMOVE PURGE VALVE (PURGE VSV) (a) Disconnect the purge valve (p
Diagnostic Trouble Code Chart
DIAGNOSTIC TROUBLE CODE CHART Telematics System DTC No. Detection Item Link U014087 Lost Communication with Body Control Module Missing Message U015587 Lost Communication with Instrument Panel Cluster (IPC) Control Module Missing Message U016387 Lost Communication
