Lexus ES: Components
COMPONENTS
ILLUSTRATION
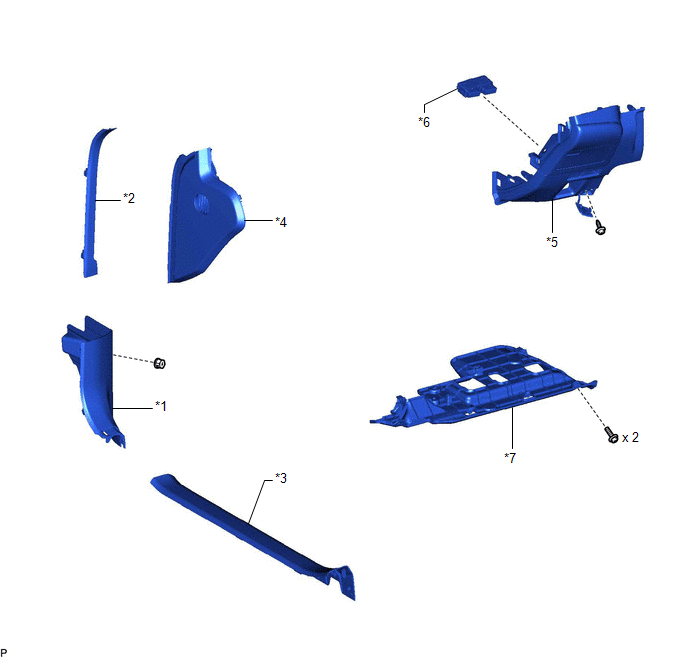
| *1 | COWL SIDE TRIM BOARD LH | *2 | FRONT DOOR OPENING TRIM COVER LH |
| *3 | FRONT DOOR SCUFF PLATE LH | *4 | INSTRUMENT SIDE PANEL LH |
| *5 | LOWER INSTRUMENT PANEL FINISH PANEL SUB-ASSEMBLY | *6 | LUGGAGE DOOR OPENING SWITCH (TRUNK AND FUEL SWITCH ASSEMBLY) |
| *7 | NO. 1 INSTRUMENT PANEL UNDER COVER SUB-ASSEMBLY | - | - |
READ NEXT:
 Removal
REMOVAL PROCEDURE 1. REMOVE FRONT DOOR SCUFF PLATE LH Click here 2. REMOVE COWL SIDE TRIM BOARD LH Click here 3. REMOVE FRONT DOOR OPENING TRIM COVER LH Click here 4. REMOVE INSTRUMENT SIDE P
Inspection
INSPECTION PROCEDURE 1. INSPECT LUGGAGE DOOR OPENING SWITCH (TRUNK AND FUEL SWITCH ASSEMBLY) (a) Check the switch. (1) Measure the resistance according to the value(s) in the table below. Standard
Installation
INSTALLATION PROCEDURE 1. INSTALL LUGGAGE DOOR OPENING SWITCH (TRUNK AND FUEL SWITCH ASSEMBLY) (a) Engage the 2 claws to install the luggage door opening switch (trunk and fuel switch assembly) as sho
SEE MORE:
Installation
INSTALLATION PROCEDURE 1. INSTALL LEAK DETECTION PUMP SUB-ASSEMBLY HINT: Only perform this procedure when replacement of the leak detection pump sub-assembly is necessary. (a) Engage the 2 claws to install a new leak detection pump sub-assembly to the No. 2 charcoal canister sub-assembly. NOTIC
Precaution
PRECAUTION
BASIC REPAIR HINT
(a) HINTS ON OPERATIONS
1
Attire
Always wear a clean uniform.
A hat and safety shoes must be worn.
2
Vehicle protection
Prepare a grille cover, fender cover, seat cove
© 2016-2026 Copyright www.lexguide.net
