Lexus ES: On-vehicle Inspection
Lexus ES (XZ10) Service Manual / Vehicle Interior / Wiper / Washer / Washer Nozzle / On-vehicle Inspection
ON-VEHICLE INSPECTION
PROCEDURE
1. INSPECT WASHER NOZZLE SUB-ASSEMBLY
(a) Operate the washer nozzle sub-assemblies and check the position that the washer fluid contacts the windshield.
Standard:
Center of washer fluid contacts the windshield in the areas shown in the illustration.
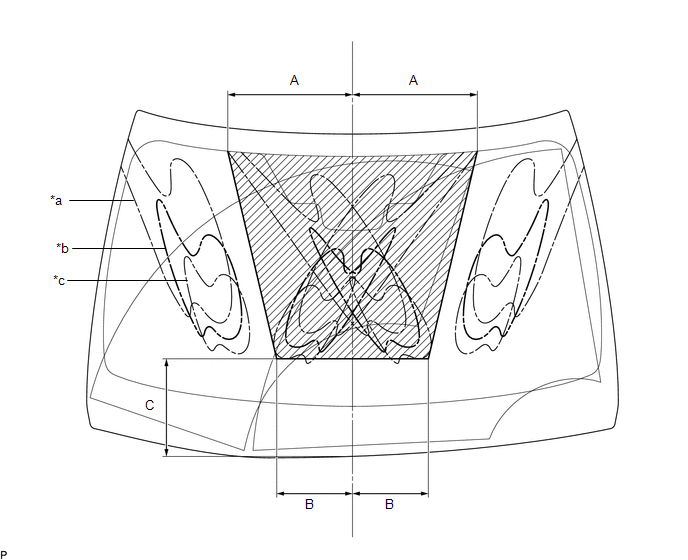
| *a | Upper Limit | *b | Standard |
| *c | Lower Limit | - | - |
.png) | Measurement | - | - |
Standard Measurement:
| Area | Measurement | Area | Measurement |
|---|---|---|---|
| A | 341.2 mm (1.14 ft.) | B | 206.9 mm (7.35 in.) |
| C | 266.5 mm (9.41 in.) | - | - |
HINT:
If the result is not as specified, replace the washer nozzle sub-assembly.
READ NEXT:
 Removal
REMOVAL CAUTION / NOTICE / HINT HINT:
Use the same procedure for the RH side and LH side.
The following procedure is for the LH side.
PROCEDURE 1. REMOVE WASHER NOZZLE SUB-ASSEMBLY (a) Using a
Adjustment
ADJUSTMENT PROCEDURE 1. REMOVE WASHER NOZZLE SUB-ASSEMBLY Click here 2. ADJUST WASHER NOZZLE SUB-ASSEMBLY (a) Select a washer nozzle sub-assembly so the position the washer fluid hits the windshield
Installation
INSTALLATION CAUTION / NOTICE / HINT HINT:
Use the same procedure for the RH side and LH side.
The following procedure is for the LH side.
PROCEDURE 1. INSTALL WASHER NOZZLE SUB-ASSEMBLY (a) C
SEE MORE:
Problem Symptoms Table
PROBLEM SYMPTOMS TABLE HINT:
Use the table below to help determine the cause of problem symptoms. If multiple suspected areas are listed, the potential causes of the symptoms are listed in order of probability in the "Suspected Area" column of the table. Check each symptom by checking the suspect
Disposal
DISPOSAL PROCEDURE 1. DISPOSE OF SUSPENSION TOWER DAMPER (a) Using a hacksaw, make a hole in the cylinder between (A) and (B) shown in the illustration to discharge the gas inside. *a 10 mm CAUTION:
Always use a cloth to prevent shards of metal from flying about due to the release of pre
© 2016-2026 Copyright www.lexguide.net
