Lexus ES: On-vehicle Inspection
ON-VEHICLE INSPECTION
PROCEDURE
1. INSPECT HOOD SUB-ASSEMBLY
(a) Check that the clearance measurements of areas a through d are within each standard range.
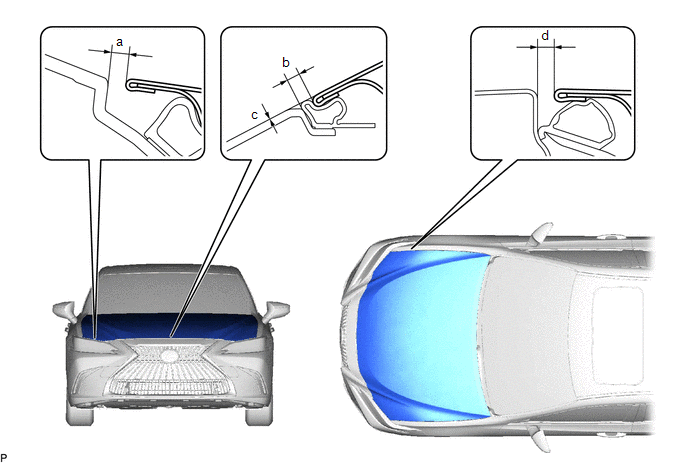 Standard Clearance
 | Area | Measurement | Area | Measurement |
|---|---|---|---|
| a | 2.85 to 5.85 mm (0.112 to 0.230 in.) | b | 1.85 to 5.85 mm (0.0728 to 0.230 in.) |
| c | -1.35 to 1.65 mm (-0.0531 to 0.0650 in.) | d | 2.2 to 5.2 mm (0.0866 to 0.205 in.) |
READ NEXT:
 Disassembly
DISASSEMBLY PROCEDURE 1. REMOVE HOOD CUSHION CENTER (a) Using a clip remover, disengage the 10 hood to cowl top seal clips to remove the hood cushion center. (b) Remove the 10 hood to c
Adjustment
ADJUSTMENT CAUTION / NOTICE / HINT *a Centering Bolt *b Standard Bolt HINT:
Centering bolts are used to install the hood hinges and hood lock. The hood and hood lock cannot be adjust
Reassembly
REASSEMBLY PROCEDURE 1. INSTALL HOOD STAY BRACKET LH Click here 2. INSTALL HOOD STAY BRACKET RH HINT: Use the same procedure as for the LH side. 3. INSTALL HOOD SUPPORT ASSEMBLY LH Click here 4. I
SEE MORE:
Short to +B in Outer Mirror Indicator(Master) (C1AB0)
DESCRIPTION This DTC is stored when the blind spot monitor sensor RH detects a short to +B in the outer rear view mirror indicator RH. DTC No. Detection Item DTC Detection Condition Trouble Area C1AB0 Short to +B in Outer Mirror Indicator(Master) Both of the following conditions ar
Components
COMPONENTS ILLUSTRATION *1 FRONT RADIATOR SIDE AIR GUIDE PLATE LH *2 FRONT RADIATOR SIDE AIR GUIDE PLATE RH *3 RADIATOR SHUTTER SUB-ASSEMBLY *4 THERMISTOR ASSEMBLY N*m (kgf*cm, ft.*lbf): Specified torque - - ILLUSTRATION *1 MOTOR COVER *2 NO. 1 RADIATOR GR
© 2016-2026 Copyright www.lexguide.net
