Lexus ES: On-vehicle Inspection
Lexus ES (XZ10) Service Manual / Vehicle Exterior / Wiper / Washer / Washer Nozzle / On-vehicle Inspection
ON-VEHICLE INSPECTION
PROCEDURE
1. INSPECT WASHER NOZZLE SUB-ASSEMBLY
(a) Operate the washer nozzle sub-assemblies and check the position that the washer fluid contacts the windshield.
Standard:
Center of washer fluid contacts the windshield in the areas shown in the illustration.
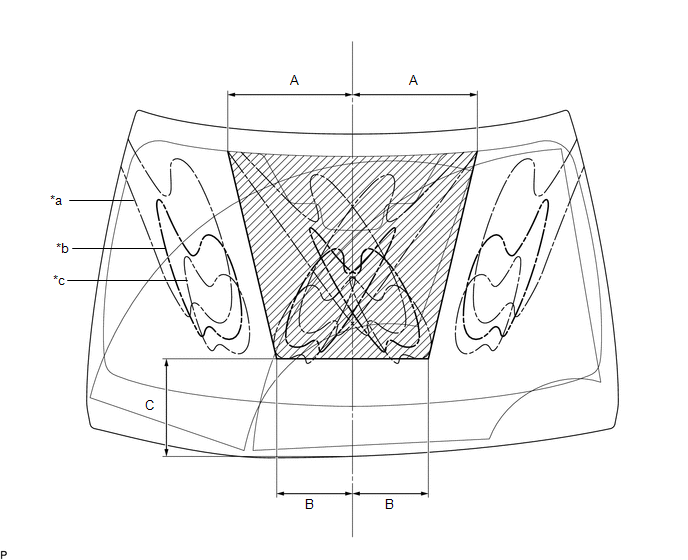
| *a | Upper Limit | *b | Standard |
| *c | Lower Limit | - | - |
.png) | Measurement | - | - |
Standard Measurement:
| Area | Measurement | Area | Measurement |
|---|---|---|---|
| A | 341.2 mm (1.14 ft.) | B | 206.9 mm (7.35 in.) |
| C | 266.5 mm (9.41 in.) | - | - |
HINT:
If the result is not as specified, replace the washer nozzle sub-assembly.
READ NEXT:
 Removal
REMOVAL CAUTION / NOTICE / HINT HINT:
Use the same procedure for the RH side and LH side.
The following procedure is for the LH side.
PROCEDURE 1. REMOVE WASHER NOZZLE SUB-ASSEMBLY (a) Using a
Adjustment
ADJUSTMENT PROCEDURE 1. REMOVE WASHER NOZZLE SUB-ASSEMBLY Click here 2. ADJUST WASHER NOZZLE SUB-ASSEMBLY (a) Select a washer nozzle sub-assembly so the position the washer fluid hits the windshield
Installation
INSTALLATION CAUTION / NOTICE / HINT HINT:
Use the same procedure for the RH side and LH side.
The following procedure is for the LH side.
PROCEDURE 1. INSTALL WASHER NOZZLE SUB-ASSEMBLY (a) C
SEE MORE:
Reassembly
REASSEMBLY PROCEDURE 1. INSTALL REAR BUMPER REINFORCEMENT (a) Install the rear bumper reinforcement with the 6 bolts. Torque: 35 N·m {357 kgf·cm, 26 ft·lbf} 2. INSTALL REAR BUMPER PROTECTOR INSERT LH (a) Engage the guide and claw to install the rear bumper protector insert LH.
Components
COMPONENTS ILLUSTRATION *A for Type A *B for Type B *1 FRONT FENDER APRON SEAL LH *2 FRONT FENDER APRON SEAL RH *3 FRONT WHEEL OPENING EXTENSION PAD LH *4 FRONT WHEEL OPENING EXTENSION PAD RH *5 NO. 1 ENGINE UNDER COVER *6 NO. 2 ENGINE UNDER COVER *7 NO.
© 2016-2026 Copyright www.lexguide.net
