Lexus ES: Installation
INSTALLATION
CAUTION / NOTICE / HINT
HINT:
- Use the same procedure for the RH side and LH side.
- The following procedure is for the LH side.
PROCEDURE
1. INSTALL WASHER NOZZLE SUB-ASSEMBLY
(a) Connect a new washer nozzle sub-assembly to the washer hose.
(b) Engage the 2 claws as indicated by the arrows, in the order shown in the illustration to install the washer nozzle sub-assembly.
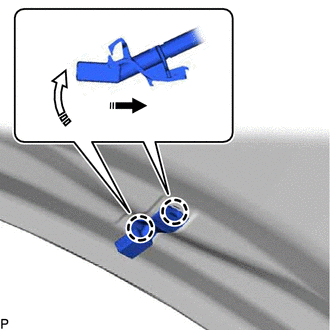
.png) | Install in this Direction (1) |
.png) | Install in this Direction (2) |
2. INSPECT WASHER NOZZLE SUB-ASSEMBLY
Click here .gif)
3. ADJUST WASHER NOZZLE SUB-ASSEMBLY
Click here
READ NEXT:
 Precaution
PRECAUTION PRECAUTION FOR DISCONNECTING CABLE FROM NEGATIVE BATTERY TERMINAL NOTICE: When disconnecting the cable from the negative (-) battery terminal, initialize the following systems after the cab
Parts Location
PARTS LOCATION ILLUSTRATION *A w/ Auto Wiper System - - *1 WINDSHIELD WIPER MOTOR ASSEMBLY *2 RAIN SENSOR *3 LEVEL WARNING SWITCH ASSEMBLY *4 WINDSHIELD WASHER MOTOR AND
SEE MORE:
High Beam Headlight Circuit
DESCRIPTION The headlight ECU sub-assembly controls the high beam headlights. WIRING DIAGRAM except Bulb Type Turn Signal Light (for TMMK Made) for Bulb Type Turn Signal Light (for TMMK Made) CAUTION / NOTICE / HINT NOTICE:
If the headlight ECU sub-assembly LH has been replaced, it is necessary
Problem Symptoms Table
PROBLEM SYMPTOMS TABLE HINT:
Use the table below to help determine the cause of problem symptoms. If multiple suspected areas are listed, the potential causes of the symptoms are listed in order of probability in the "Suspected Area" column of the table. Check each symptom by checking the suspect
© 2016-2026 Copyright www.lexguide.net
