Lexus ES: Lubrication System
On-vehicle Inspection
ON-VEHICLE INSPECTION
PROCEDURE
1. CHECK ENGINE OIL LEVEL
(a) Warm up and stop the engine, then wait for 5 minutes.
(b) Check that the engine oil level is between the low level and full level marks on the engine oil level dipstick.
If the level is low, check for engine oil leaks and add engine oil to the full level mark.
NOTICE:
Do not fill to above the full level mark.
HINT:
A certain amount of engine oil will be consumed while driving. In the following situations, engine oil consumption may increase, and engine oil may need to be refilled in between oil maintenance intervals.
- When the engine is new, for example directly after purchasing the vehicle or after replacing the engine.
- If low quality engine oil or oil of an inappropriate viscosity is used.
- When driving at high engine speeds or with a heavy load (when towing, etc.), or when accelerating or decelerating frequently while driving.
- When idling for a long time, or when driving frequently through heavy traffic.
When judging the amount of oil consumption, keep in mind that the oil may have become diluted, making it difficult to judge the true level accurately.
2. CHECK ENGINE OIL QUALITY
(a) Check the engine oil for deterioration, water intrusion, discoloration or thinning.
If the quality is visibly poor, replace the engine oil and oil filter element.
3. INSPECT OIL PRESSURE
CAUTION:
-
To prevent injury due to contact with an operating V-ribbed belt or cooling fan, keep your hands and clothing away from the V-ribbed belt and cooling fan when working in the engine compartment with the engine running or the engine switch on (IG).
.png)
-
To prevent burns, do not touch the engine, exhaust manifold or other high temperature components while the engine is hot.
.png)
-
To prevent burns, do not remove the engine oil pressure switch assembly while the engine is hot.
(a) Remove the front fender apron seal RH.
Click here .gif)
(b) Remove the engine oil pressure switch assembly.
Click here
| (c) Install an oil pressure gauge with the adapter. |
|
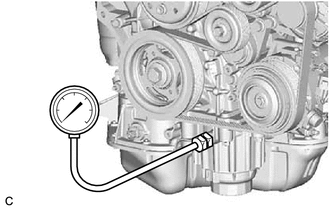
(d) Warm up the engine.
HINT:
After warming up the engine, the engine coolant temperature is 75 to 100°C (167 to 212°F).
(e) Check the oil pressure.
Standard Oil Pressure:
| Condition | Specified Condition |
|---|---|
| Idling | 30 kPa (0.3 kgf/cm2, 4.4 psi) or higher |
| 3000 rpm | 200 kPa (2.0 kgf/cm2, 29 psi) or higher |
If the result is not as specified, check the quality of the engine oil and check the oil paths for clogging. Repair or replace if necessary. If the engine oil pressure is still not as specified, check the timing chain cover assembly.
Click here
(f) Remove the oil pressure gauge with the adapter.
(g) Install the engine oil pressure switch assembly.
Click here
(h) Inspect for engine oil leaks.
Click here
(i) Install the front fender apron seal RH.
Click here
READ NEXT:
 Oil And Oil Filter
ComponentsCOMPONENTS ILLUSTRATION *A Type A *B Type B *1 FRONT WHEEL OPENING EXTENSION PAD LH *2 FRONT WHEEL OPENING EXTENSION PAD RH *3 NO. 1 ENGINE UNDER COVER *4 NO.
Components
COMPONENTS ILLUSTRATION *1 ENGINE OIL LEVEL SENSOR *2 NO. 2 OIL PAN SUB-ASSEMBLY *3 OIL STRAINER SUB-ASSEMBLY *4 OIL STRAINER GASKET N*m (kgf*cm, ft.*lbf): Specified torque
SEE MORE:
Customize Parameters
CUSTOMIZE PARAMETERS CUSTOMIZE LUGGAGE COMPARTMENT DOOR OPENER SYSTEM NOTICE:
When the customer requests a change in a function, first make sure that the function can be customized.
Be sure to make a note of the current settings before customizing.
When troubleshooting a function, first make
Automatic High Beam Camera (B124C)
DESCRIPTION The main body ECU (multiplex network body ECU) detects a high beam headlight illumination request signal of the automatic high beam system from the forward recognition camera. DTC No. Detection Item DTC Detection Condition Trouble Area DTC Output from B124C Automatic Hig
