Lexus ES: License Plate Light Assembly
Components
COMPONENTS
ILLUSTRATION
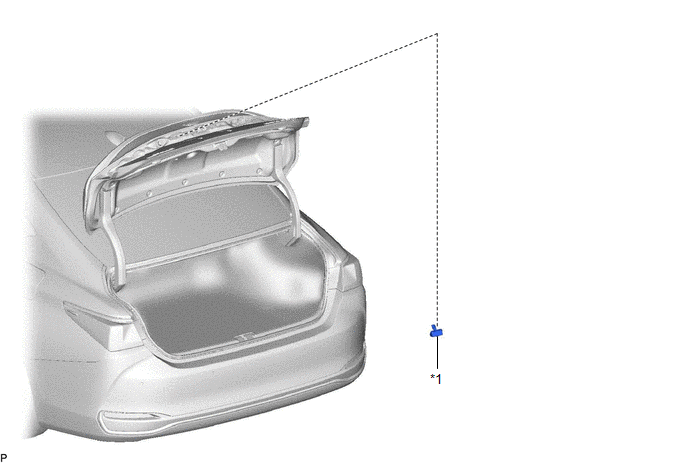
| *1 | LICENSE PLATE LIGHT ASSEMBLY | - | - |
Removal
REMOVAL
CAUTION / NOTICE / HINT
HINT:
- Use the same procedure for the RH side and LH side.
- The following procedure is for the LH side.
PROCEDURE
1. REMOVE LUGGAGE COMPARTMENT DOOR OUTSIDE GARNISH SUB-ASSEMBLY
Click here .gif)
2. REMOVE LICENSE PLATE LIGHT ASSEMBLY
| (a) Disconnect the connector. |
|
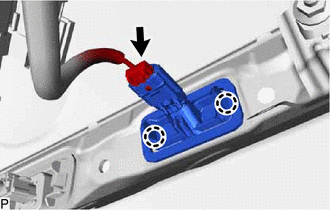
(b) Disengage the 2 claws to remove the license plate light assembly.
Inspection
INSPECTION
PROCEDURE
1. INSPECT LICENSE PLATE LIGHT ASSEMBLY LH
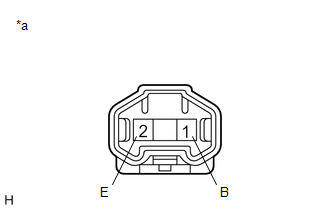
| *a | Component without harness connected (License Plate Light Assembly LH) |
(a) Connect 4 dry-cell batteries (1.5 V) in series.
NOTICE:
Do not use rechargeable batteries as they may not output a voltage of 1.5 V.
(b) Apply 6.0 V battery voltage to the license plate light assembly LH and check that the light illuminates.
OK:
| Measurement Condition | Specified Condition |
|---|---|
| Positive (+) lead from the batteries → Terminal 1 (B) Negative (-) lead from the batteries → Terminal 2 (E) | License plate light illuminates |
If the result is not as specified, replace the license plate light assembly LH.
2. INSPECT LICENSE PLATE LIGHT ASSEMBLY RH
| *a | Component without harness connected (License Plate Light Assembly RH) |
(a) Connect 4 dry-cell batteries (1.5 V) in series.
NOTICE:
Do not use rechargeable batteries as they may not output a voltage of 1.5 V.
(b) Apply 6.0 V battery voltage to the license plate light assembly RH and check that the light illuminates.
OK:
| Measurement Condition | Specified Condition |
|---|---|
| Positive (+) lead from the batteries → Terminal 1 (B) Negative (-) lead from the batteries → Terminal 2 (E) | License plate light illuminates |
If the result is not as specified, replace the license plate light assembly RH.
Installation
INSTALLATION
CAUTION / NOTICE / HINT
HINT:
- Use the same procedure for the RH side and LH side.
- The following procedure is for the LH side.
PROCEDURE
1. INSTALL LICENSE PLATE LIGHT ASSEMBLY
(a) Engage the 2 claws to install the license plate light assembly.
(b) Connect the connector.
2. INSTALL LUGGAGE COMPARTMENT DOOR OUTSIDE GARNISH SUB-ASSEMBLY
Click here .gif)
READ NEXT:
 Precaution
PRECAUTION PRECAUTION FOR DISCONNECTING CABLE FROM NEGATIVE BATTERY TERMINAL NOTICE: When disconnecting the cable from the negative (-) battery terminal, initialize the following systems after the cab
Parts Location
PARTS LOCATION ILLUSTRATION *1 PARK/NEUTRAL POSITION SWITCH ASSEMBLY *2 SIDE TURN SIGNAL LIGHT ASSEMBLY LH *3 SIDE TURN SIGNAL LIGHT ASSEMBLY RH *4 HEADLIGHT ASSEMBLY LH - HEADLIGH
SEE MORE:
Washer Motor Circuit
DESCRIPTION When the windshield washer motor and pump assembly receives signals from the windshield wiper switch assembly it operates to spray washer fluid from the washer nozzle sub-assemblies. WIRING DIAGRAM CAUTION / NOTICE / HINT NOTICE:
Inspect the fuses for circuits related to this system
Panoramic Moon Roof System does not Operate
DESCRIPTION The sliding roof ECU (sliding roof drive gear assembly) and roof sunshade ECU (sliding roof drive gear assembly) receive each other's position information from the main body ECU (multiplex network body ECU) via LIN communication. The sliding roof ECU (sliding roof drive gear assembly) an
