Lexus ES: Installation
INSTALLATION
CAUTION / NOTICE / HINT
HINT:
- Use the same procedure for the RH side and LH side.
- The following procedure is for the LH side.
PROCEDURE
1. INSTALL REAR DOOR WINDOW FRAME MOULDING SUB-ASSEMBLY
(a) Engage the guide to temporarily install the rear door window frame moulding sub-assembly to the door frame.
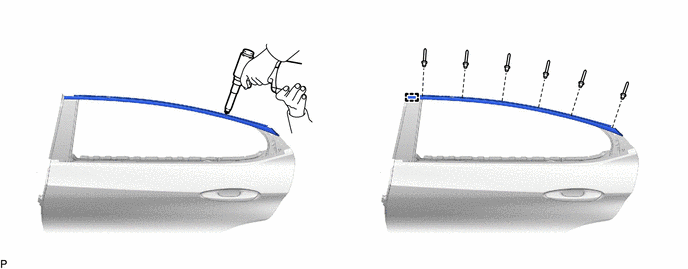
(b) Using an air riveter or hand riveter with a nose piece, install the rear door window frame moulding sub-assembly with 6 new rivets.
HINT:
If the mandrel of the rivet does not come off on the first operation of the rivet gun, slide the rivet gun forward on the mandrel and operate it again.
NOTICE:
-
Do not pry the rivet with the riveter, as this will cause damage to the riveter and mandrel.
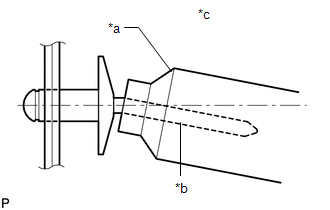
*a
Riveter
*b
Mandrel
*c
Incorrect
-
Confirm that the rivets are seated properly against the moulding.
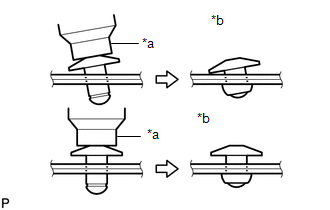
*a
Riveter
*b
Incorrect
- Do not tilt the riveter when installing the rivet to the moulding.
- Do not leave any space between the rivet head and moulding.
-
Do not leave any space between the moulding and door frame. Firmly hold the 2 items together while installing the rivet.
.png)
*a
Riveter
*b
Incorrect
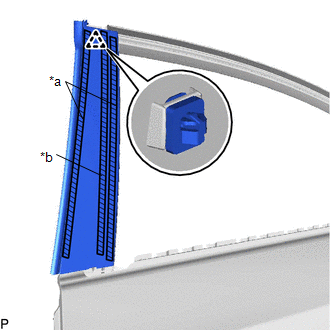
2. INSTALL REAR DOOR FRONT WINDOW FRAME MOULDING
HINT:
When installing a new rear door front window frame moulding, heat the vehicle body and rear door front window frame moulding using a heat light.
Heating Temperature| Item | Temperature |
|---|---|
| Vehicle Body | 40 to 60°C (104 to 140°F) |
| Rear Door Front Window Frame Moulding | 20 to 30°C (68 to 86°F) |
CAUTION:
- Do not touch the heat light and heated parts, touching the heat light may result in burns.
- Touching heated parts for a long time may result in burns.
.png)
| *a | Heated Part |
| *b | Heat Light |
NOTICE:
Do not heat the vehicle body or rear door front window frame moulding excessively.
(a) Clean the vehicle body surface.
(1) Using a heat light, heat the vehicle body surface.
(2) Remove any double-sided tape from the vehicle body.
(3) Wipe off any tape adhesive residue with cleaner.
(b) Install a new rear door front window frame moulding.
(1) Using a heat light, heat the vehicle body and rear door front window frame moulding.
(2) Remove the release paper from the rear door front window frame moulding.
HINT:
After removing the release paper, keep the exposed adhesive free from foreign matter.
| (3) Engage the clip and attach the double-sided tape and caulking sponge to install the rear door front window frame moulding. HINT: Press the rear door front window frame moulding firmly to install it. |
|
3. CONNECT REAR DOOR WEATHERSTRIP
(a) Engage the 7 clips and connect the rear door weatherstrip.
4. INSTALL REAR DOOR BELT MOULDING ASSEMBLY
Click here .gif)
READ NEXT:
 Components
COMPONENTS ILLUSTRATION *A w/ Power Trunk Lid System *B for TMMK Made *1 LUGGAGE COMPARTMENT DOOR COVER *2 LUGGAGE LOCK CONTROL CABLE PLATE *3 REAR SPOILER SUB-ASSEMBLY *4
Removal
REMOVAL PROCEDURE 1. REMOVE LUGGAGE LOCK CONTROL CABLE PLATE Click here 2. REMOVE SWITCH BEZEL (w/ Power Trunk Lid System) Click here 3. REMOVE LUGGAGE COMPARTMENT DOOR COVER Click here 4. REMOV
SEE MORE:
Rr Sensor Initialization Incomplete (C1AF4)
DESCRIPTION When it is judged that the rear sensors have not been initialized, the clearance warning ECU assembly stores DTC C1AF4. DTC No. Detection Item DTC Detection Condition Trouble Area C1AF4 Rr Sensor Initialization Incomplete Rear sensor not initialized
Initialize rear
Front Passenger Side Power Mirror cannot be Adjusted with Power Mirror Switch
DESCRIPTION The outer mirror switch assembly sends the mirror adjust switch signals to the main body ECU (multiplex network body ECU). The main body ECU (multiplex network body ECU) then sends the received mirror adjust switch signals to the outer mirror control ECU assembly (front passenger door) v
