
Lexus ES: Installation
INSTALLATION
PROCEDURE
1. INSTALL TELEPHONE ANTENNA ASSEMBLY (for Moon Roof)
(a) When reusing the telephone antenna assembly:
(1) Install a new seal.
(b) Push the telephone antenna assembly in the direction indicated by the arrow (1) shown in the illustration to engage the guide.
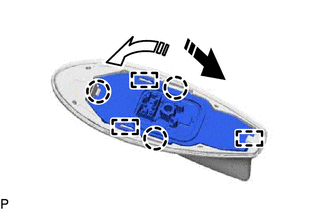
.png) | Install in this Direction (1) |
 | Install in this Direction (2) |
(c) Push the telephone antenna assembly in the direction indicated by the arrow (2) shown in the illustration to engage the 2 guides and 3 claws to install the telephone antenna assembly.
2. INSTALL TELEPHONE ANTENNA ASSEMBLY WITH COVER (for Moon Roof)
(a) Temporarily install the telephone antenna assembly with cover as shown in the illustration.
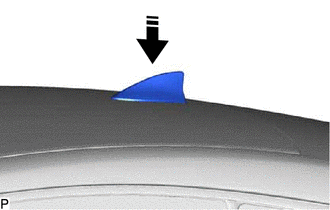
| | Install in this Direction |
(b) Install a new washer and holder as shown in the illustration.
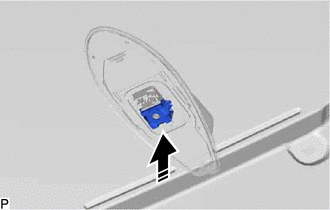
| | Install in this Direction |
(c) Install the telephone antenna assembly with cover with the bolt.
Torque:
9.5 N·m {97 kgf·cm, 84 in·lbf}
(d) Connect the connector.
3. INSTALL TELEPHONE ANTENNA ASSEMBLY (for Panoramic Moon Roof)
(a) Engage the 2 claws to temporarily install the telephone antenna assembly as shown in the illustration.
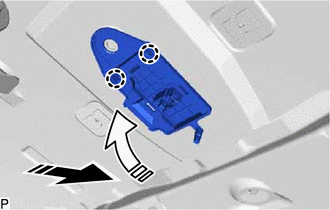
| | Install in this Direction (1) |
| | Install in this Direction (2) |
(b) Install the clip.
(c) Install the telephone antenna assembly with the nut.
Torque:
16.5 N·m {168 kgf·cm, 12 ft·lbf}
(d) Connect the connector.
4. INSTALL ROOF HEADLINING ASSEMBLY
Click here .gif)
READ NEXT:
 Removal
REMOVAL CAUTION / NOTICE / HINT The necessary procedures (adjustment, calibration, initialization, or registration) that must be performed after parts are removed and installed, or replaced during tel
Stereo Component Amplifier
ComponentsCOMPONENTS ILLUSTRATION *1 AUDIO AMPLIFIER COVER *2 STEREO COMPONENT AMPLIFIER ASSEMBLY WITH BRACKET ILLUSTRATION *A for 10 Speakers *B for 17 Speakers *1 NO. 1
SEE MORE:
On-vehicle Inspection
ON-VEHICLE INSPECTION CAUTION / NOTICE / HINT HINT: Refer to Problem Symptoms Table. Click here PROCEDURE 1. REMOVE FRONT WHEEL OPENING EXTENSION PAD LH Click here 2. REMOVE FRONT WHEEL OPENING EXTENSION PAD RH Click here 3. REMOVE NO. 1 ENGINE UNDER COVER Click here 4. REMOVE NO. 3 EN
Replacement
REPLACEMENT CAUTION / NOTICE / HINT HINT:
Use the same procedure for bank 1 and bank 2.
The following procedure is for bank 2.
PROCEDURE 1. REPLACE INTAKE VALVE GUIDE BUSH (a) Heat the cylinder head LH to between 80 and 100°C (176 and 212°F). (b) Place the cylinder head LH on wooden blocks
