Lexus ES: Installation
Lexus ES (XZ10) Service Manual / Vehicle Exterior / Exterior Panels / Trim / Grille Shutter / Installation
INSTALLATION
PROCEDURE
1. INSTALL RADIATOR SHUTTER SUB-ASSEMBLY
(a) Engage the 2 guides as shown in the illustration.
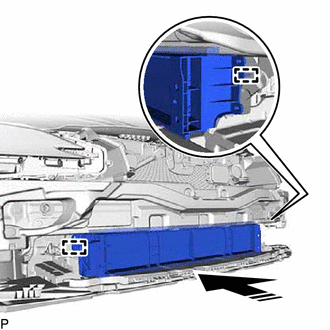
.png) | Install in this Direction |
(b) Install the radiator shutter sub-assembly with the 3 bolts.
Torque:
5.5 N·m {56 kgf·cm, 49 in·lbf}
(c) Engage the clamp.
(d) Connect the connector.
2. INSTALL THERMISTOR ASSEMBLY
Click here .gif)
3. INSTALL FRONT RADIATOR SIDE AIR GUIDE PLATE RH
(a) Engage the 2 claws to install the front radiator side air guide plate RH.
4. INSTALL FRONT RADIATOR SIDE AIR GUIDE PLATE LH
(a) Engage the 2 claws to install the front radiator side air guide plate LH.
5. INSTALL FRONT BUMPER ASSEMBLY
Click here
READ NEXT:
 Precaution
PRECAUTION PRECAUTION FOR DISCONNECTING CABLE FROM NEGATIVE AUXILIARY BATTERY TERMINAL NOTICE: When disconnecting the cable from the negative (-) auxiliary battery terminal, initialize the following s
Parts Location
PARTS LOCATION ILLUSTRATION *1 SWING GRILLE ACTUATOR ASSEMBLY *2 RADIATOR SHUTTER SUB-ASSEMBLY *3 ECM - - ILLUSTRATION *1 COMBINATION METER ASSEMBLY *2 INSTRUMENT PANE
SEE MORE:
Light Sensor Circuit (B1244)
DESCRIPTION The automatic light control sensor detects ambient light. The sensor creates an electrical signal based on the amount of light detected, and sends the signal to the main body ECU (multiplex network body ECU). The main body ECU (multiplex network body ECU) turns on or off the headlights a
Components
COMPONENTS ILLUSTRATION *1 UPPER HV BATTERY COVER SUB-ASSEMBLY *2 BATTERY VOLTAGE SENSOR *3 NO. 1 HV BATTERY SHIELD PANEL - - N*m (kgf*cm, ft.*lbf): Specified torque - -
© 2016-2026 Copyright www.lexguide.net
