Lexus ES: Installation
Lexus ES (XZ10) Service Manual / Vehicle Exterior / Door / Hatch / Rear Door Opening Trim Weatherstrip / Installation
INSTALLATION
CAUTION / NOTICE / HINT
HINT:
- Use the same procedure for the RH side and LH side.
- The following procedure is for the LH side.
PROCEDURE
1. INSTALL REAR DOOR OPENING TRIM WEATHERSTRIP
(a) Align the alignment mark on the rear door opening trim weatherstrip with the flange on the vehicle body indicated by the arrow in the illustration, and install the rear door opening trim weatherstrip.
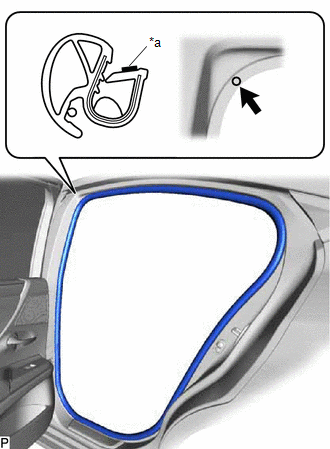
| *a | Alignment Mark |
.png) | Flange Position |
NOTICE:
- Make sure to align the alignment mark with the flange when installing the weatherstrip. If the alignment mark is not aligned, water ingress may occur.
- After installation, check that the corners fit correctly.
HINT:
- Make sure to install the part of the rear door opening trim weatherstrip near the alignment mark first.
-
The color of the alignment marks on the rear door opening trim weatherstrip LH and rear door opening trim weatherstrip RH are different.
Alignment Mark:
Location
Color
for LH Side
White
for RH Side
Yellow Orange
2. INSTALL ROOF HEADLINING ASSEMBLY
Click here .gif)
READ NEXT:
 Components
COMPONENTS ILLUSTRATION *1 LUGGAGE COMPARTMENT FLOOR MAT *2 SPARE WHEEL COVER TRAY ILLUSTRATION *1 REAR FLOOR FINISH PLATE *2 LUGGAGE HOLD BELT STRIKER ASSEMBLY ILLUSTRATION
Removal
REMOVAL CAUTION / NOTICE / HINT The necessary procedures (adjustment, calibration, initialization, or registration) that must be performed after parts are removed and installed, or replaced during lug
SEE MORE:
Initialization
INITIALIZATION INITIALIZE PANORAMIC MOON ROOF SYSTEM (FOR SLIDING ROOF) NOTICE:
When the sliding roof glass sub-assembly, sliding roof housing panel or slide roof rail sub-assembly is adjusted or removed/installed, or the sliding roof ECU (sliding roof drive gear assembly) is replaced, the slidin
Removal
REMOVAL CAUTION / NOTICE / HINT The necessary procedures (adjustment, calibration, initialization, or registration) that must be performed after parts are removed and installed, or replaced during rear trailing arm assembly removal/installation are shown below. Necessary Procedures After Parts Remov
© 2016-2026 Copyright www.lexguide.net
