Lexus ES: Installation
INSTALLATION
PROCEDURE
1. INSTALL REAR UPPER CONTROL ARM ASSEMBLY LH
| (a) Temporarily install the rear upper control arm assembly LH to the rear suspension member sub-assembly with the bolt and nut. NOTICE:
|
|
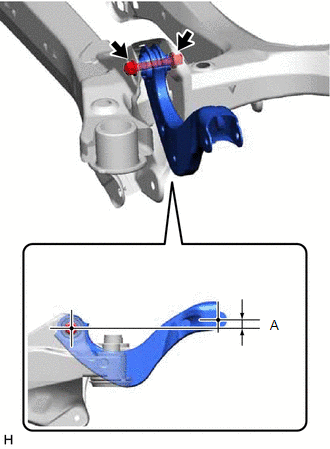
(b) Position the rear upper control arm assembly LH as shown in the illustration.
Reference Length (A):
1.2 mm (0.0472 in.)
(c) Fully tighten the bolt.
Torque:
73 N·m {744 kgf·cm, 54 ft·lbf}
NOTICE:
Because the nut has its own stopper, do not turn the nut. Tighten the bolt with the nut secured.
2. INSTALL REAR UPPER CONTROL ARM ASSEMBLY RH
HINT:
Perform the same procedure as for the LH side.
3. INSTALL REAR SUSPENSION MEMBER SUB-ASSEMBLY
Click here .gif)
READ NEXT:
 Removal
REMOVAL CAUTION / NOTICE / HINT The necessary procedures (adjustment, calibration, initialization, or registration) that must be performed after parts are removed and installed, or replaced during rea
Installation
INSTALLATION PROCEDURE 1. INSTALL REAR UPPER CONTROL ARM ASSEMBLY LH (for 2WD) (a) Temporarily install the rear upper control arm assembly LH to the rear suspension member sub-assembly with the bol
SEE MORE:
Child safety
Riding with children
Observe the following precautions
when children are in the vehicle.
Use a child restraint system appropriate
for the child, until the child
becomes large enough to properly
wear the vehicle's seat belt.
It is recommended that children
sit in the rear seats to avoid
Removal
REMOVAL CAUTION / NOTICE / HINT The necessary procedures (adjustment, calibration, initialization, or registration) that must be performed after parts are removed and installed, or replaced during front stabilizer bar removal/installation are shown below. Necessary Procedure After Parts Removed/Inst
© 2016-2026 Copyright www.lexguide.net
