Lexus ES: Installation
INSTALLATION
CAUTION / NOTICE / HINT
NOTICE:
This procedure includes the installation of small-head bolts. Refer to Small-Head Bolts of Basic Repair Hint to identify the small-head bolts.
Click here .gif)
PROCEDURE
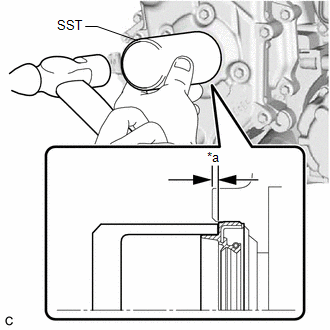
1. INSTALL TIMING CHAIN COVER OIL SEAL
(a) Apply MP grease to the lip of a new timing chain cover oil seal.
NOTICE:
- Keep the lip free from foreign matter.
- Do not allow MP grease to contact the dust seal.
| (b) Using SST and a hammer, tap in the timing chain cover oil seal. SST: 09223-00010 Standard Depth: 0 to 2 mm (0 to 0.0787 in.) (From the edge of the No. 2 timing chain cover assembly) NOTICE: Do not tap in the timing chain cover oil seal at an angle. |
|
2. INSTALL CRANKSHAFT PULLEY ASSEMBLY
Click here
3. INSTALL ENGINE ASSEMBLY WITH TRANSAXLE
Click here
READ NEXT:
 Components
COMPONENTS ILLUSTRATION *A Type A *B Type B *1 REAR ENGINE OIL SEAL *2 TRANSMISSION INPUT DAMPER ASSEMBLY *3 FLYWHEEL SUB-ASSEMBLY *4 NO. 1 CRANKSHAFT POSITION SENSOR PLA
Removal
REMOVAL CAUTION / NOTICE / HINT The necessary procedures (adjustment, calibration, initialization, or registration) that must be performed after parts are removed and installed, or replaced during rea
SEE MORE:
Lost Communication with ECM/PCM "A" Missing Message (U010087,...,U117587)
DESCRIPTION The hybrid vehicle control ECU transmits and receives signals via CAN communication to and from the ECM, yaw rate sensor, skid control ECU assembly, power steering ECU assembly, main body ECU, airbag ECU assembly, and air conditioning amplifier assembly. DTC No. Detection Item DTC
Removal
REMOVAL CAUTION / NOTICE / HINT The necessary procedures (adjustment, calibration, initialization or registration) that must be performed after parts are removed and installed, or replaced during brake master cylinder sub-assembly removal/installation are shown below. Necessary Procedures After Part
© 2016-2026 Copyright www.lexguide.net
