Lexus ES: Installation
INSTALLATION
PROCEDURE
1. INSTALL AIR FUEL RATIO SENSOR
HINT:
Perform "Inspection After Repair" after replacing the air fuel ratio sensor.
Click here .gif)
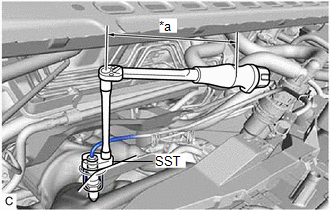
| (a) Using SST, install the air fuel ratio sensor to the exhaust manifold (TWC: Front Catalyst). SST: 09224-00012 Torque: Specified tightening torque : 44 N·m {449 kgf·cm, 32 ft·lbf} NOTICE: If the air fuel ratio sensor has been struck or dropped, replace it. HINT:
|
|
| (b) Connect the air fuel ratio sensor connector. |
|
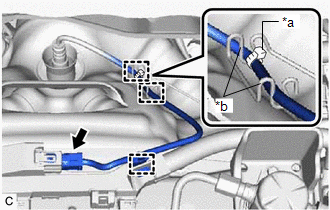
(c) Engage the 3 wire harness clamps so that the tie band is positioned as shown in the illustration.
2. INSTALL NO. 1 ENGINE COVER SUB-ASSEMBLY
Click here
3. INSPECT FOR EXHAUST GAS LEAK
Click here
4. PERFORM INITIALIZATION
(a) Perform "Inspection After Repair" after replacing the air fuel ratio sensor.
Click here
READ NEXT:
 Components
COMPONENTS ILLUSTRATION *1 AIR FUEL RATIO SENSOR - - N*m (kgf*cm, ft.*lbf): Specified torque * For use with SST
Removal
REMOVAL CAUTION / NOTICE / HINT The necessary procedures (adjustment, calibration, initialization, or registration) that must be performed after parts are removed and installed, or replaced during air
SEE MORE:
Cargo and luggage
Take notice of the following information
about storage precautions,
cargo capacity and load:
WARNING
■Things that must not be carried in the
trunk
The following things may cause a fire if
loaded in the trunk:
Receptacles containing gasoline
Aerosol cans
■Storage precautions
Obse
Clearance Warning ECU Power Source Circuit
DESCRIPTION This circuit provides power to operate the clearance warning ECU assembly. WIRING DIAGRAM CAUTION / NOTICE / HINT NOTICE: Inspect the fuses for circuits related to this system before performing the following procedure. PROCEDURE 1. CHECK HARNESS AND CONNECTOR (CLEARANCE WARNING EC
