Lexus ES: Installation
INSTALLATION
PROCEDURE
1. INSTALL TIMING CHAIN CASE OIL SEAL
| (a) Apply MP grease to the lip of a new timing chain case oil seal. |
|
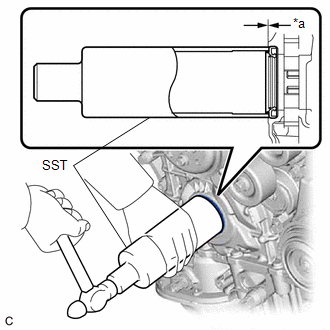
(b) Using SST and a hammer, tap in the timing chain case oil seal until its surface is flush with the timing chain cover assembly edge.
SST: 09316-60012
09316-00011
Oil Seal Protrusion Height:
0 to 1.0 mm (0 to 0.0394 in.)
NOTICE:
- Keep the lip free from foreign matter.
- Do not tap in the timing chain case oil seal at an angle.
2. INSTALL CRANKSHAFT PULLEY
(a) Align the pulley set key with the key groove of the crankshaft pulley.
(b) Using SST to hold the crankshaft pulley in place, tighten the crankshaft pulley set bolt.
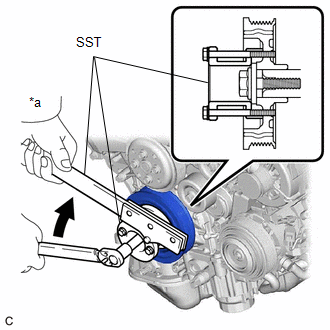
| *a | Hold |
.png) | Turn |
SST: 09213-70011
09213-70020
SST: 09330-00021
Torque:
260 N·m {2651 kgf·cm, 192 ft·lbf}
3. INSTALL V-RIBBED BELT
Click here .gif)
4. INSTALL ENGINE ASSEMBLY WITH TRANSAXLE
Click here
READ NEXT:
 Components
COMPONENTS ILLUSTRATION *1 REAR ENGINE OIL SEAL *2 NO. 1 CRANKSHAFT POSITION SENSOR PLATE *3 DRIVE PLATE AND RING GEAR SUB-ASSEMBLY *4 REAR DRIVE PLATE SPACER N*m (kgf*cm, f
Removal
REMOVAL CAUTION / NOTICE / HINT The necessary procedures (adjustment, calibration, initialization or registration) that must be performed after parts are removed and installed, or replaced during rear
SEE MORE:
System Description
SYSTEM DESCRIPTION ACTIVE NOISE CONTROL SYSTEM (a) The active noise control system is a system that detects muffled engine sounds produced in sync that fluctuates according to the engine speed, by using the active noise control microphone and outputs anti-phase control sound through the audio speake
Calibration
CALIBRATION ADJUST PANORAMIC VIEW MONITOR SYSTEM (a) This panoramic view monitor system can be set from the diagnostic screen of the multi-display assembly. (b) If the following operations are performed, it is necessary to perform adjustments and checks on the diagnostic screen. Part Name Opera
