
Lexus ES: Components
COMPONENTS
ILLUSTRATION
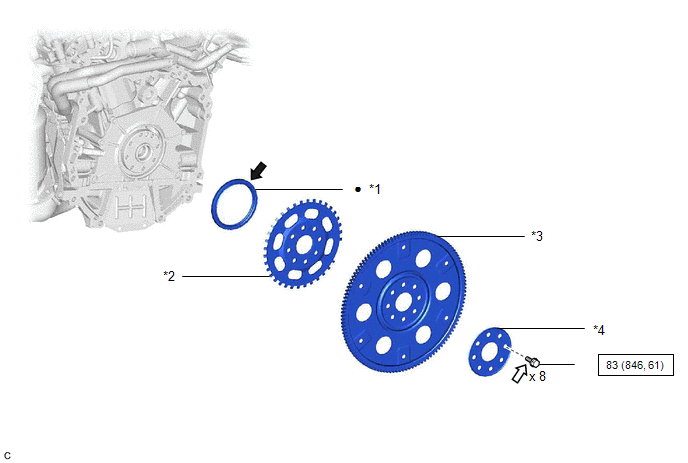
| *1 | REAR ENGINE OIL SEAL | *2 | NO. 1 CRANKSHAFT POSITION SENSOR PLATE |
| *3 | DRIVE PLATE AND RING GEAR SUB-ASSEMBLY | *4 | REAR DRIVE PLATE SPACER |
.png) | N*m (kgf*cm, ft.*lbf): Specified torque | ● | Non-reusable part |
.png) | MP grease | .png) | Adhesive 1324 |
| ★ | Precoated part | - | - |
READ NEXT:
 Removal
REMOVAL CAUTION / NOTICE / HINT The necessary procedures (adjustment, calibration, initialization or registration) that must be performed after parts are removed and installed, or replaced during rear
Installation
INSTALLATION PROCEDURE 1. INSTALL REAR ENGINE OIL SEAL (a) Using height adjustment attachments and plate lift attachments, place the engine assembly on a flat level surface. NOTICE:
Using height ad
SEE MORE:
Steering Sensor Signal Malfunction (C1784)
DESCRIPTION Steering sensor signals are sent to the absorber control ECU via CAN communication. If a communication error is detected, DTC C1784 is stored. DTC No. Detection Item DTC Detection Condition Trouble Area Warning Indicate Memory C1784 Steering Sensor Signal Malfunction
Freeze Frame Data
FREEZE FRAME DATA FREEZE FRAME DATA (a) Whenever a DTC is detected, the windshield wiper motor assembly stores the current vehicle state as Freeze Frame Data. CHECK FREEZE FRAME DATA (a) Connect the Techstream to the DLC3. (b) Turn the power switch on (IG). (c) Turn the Techstream on. (d) Enter the
© 2016-2026 Copyright www.lexguide.net
