Lexus ES: Installation
INSTALLATION
PROCEDURE
1. INSTALL BATTERY
(a) w/ Battery Insulator
(1) Install the battery insulator to the battery.
(b) Install the battery to the vehicle.
(c) Install the No. 2 battery clamp to the battery clamp sub-assembly with the bolt.
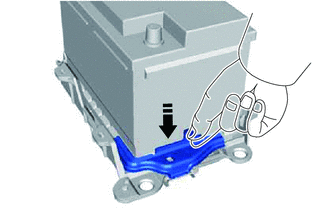
.png) |
Remove in this Direction |
Torque:
18.5 N·m {189 kgf·cm, 14 ft·lbf}
(d) Connect the cable to the positive (+) battery terminal and tighten the nut.
Torque:
5.4 N·m {55 kgf·cm, 48 in·lbf}
(e) Engage the 2 claws to install the battery terminal cap to the positive (+) battery terminal.
2. CONNECT CABLE TO NEGATIVE BATTERY TERMINAL
(a) Connect the cable to the negative (-) battery terminal and tighten the nut.
Torque:
5.4 N·m {55 kgf·cm, 48 in·lbf}
NOTICE:
When disconnecting the cable, some systems need to be initialized after the cable is reconnected.
Click here .gif)
READ NEXT:
 2gr-fks Coolant
Components
COMPONENTS
ILLUSTRATION
*1
RADIATOR CAP SUB-ASSEMBLY
*2
RADIATOR DRAIN COCK PLUG
*3
NO. 1 ENGINE UNDER COVER
2gr-fks Drive Belt
Components
COMPONENTS
ILLUSTRATION
*1
FRONT FENDER APRON SEAL RH
*2
V-RIBBED BELT
N*m (kgf*cm, ft.*lbf): Specified torque
SEE MORE:
Terminals Of Ecu
TERMINALS OF ECU CHECK LUGGAGE CLOSER MOTOR ASSEMBLY (a) Disconnect the R7 luggage closer motor assembly connector. (b) Measure the voltage and resistance according to the value(s) in the table below. Terminal No. (Symbol) Wiring Color Terminal Description Condition Specified Condition
Installation
INSTALLATION CAUTION / NOTICE / HINT for HV Model:
When removing or installing the front disc brake caliper assembly, pushing back the disc brake piston may cause a large clearance between the brake pads and brake disc. When the brake pedal is depressed with a large clearance between the brake pa
