Lexus ES: Inspection
INSPECTION
PROCEDURE
1. INSPECT LEVEL WARNING SWITCH ASSEMBLY
HINT:
This check should be performed with the level warning switch assembly installed to the washer jar.
| (a) Fill the washer jar with washer fluid. |
|
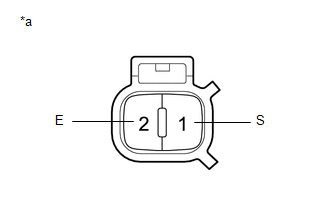
(b) Measure the resistance according to the value(s) in the table below.
Standard Resistance:
| Tester Connection | Condition | Specified Condition |
|---|---|---|
| 1 (S) - 2 (E) | Fluid volume is 600 to 800 cc (36.6 to 48.8 cu. in.) or higher* | 10 kΩ or higher |
| Fluid volume is 600 to 800 cc (36.6 to 48.8 cu. in.) or lower* | Below 1 Ω |
HINT:
*: The level warning switch assembly begins operating when the fluid volume is 600 to 800 cc (36.6 to 48.8 cu. in.) depending on the vehicle condition.
If the result is not as specified, replace the level warning switch assembly.
READ NEXT:
 Installation
INSTALLATION PROCEDURE 1. INSTALL LEVEL WARNING SWITCH ASSEMBLY (a) Install the level warning switch assembly as shown in the illustration. *a Protrusion *b Marking Install in this
Components
COMPONENTS ILLUSTRATION *1 FRONT FENDER LINER RETAINER *2 FRONT WHEEL OPENING EXTENSION PAD RH *3 PIN HOLD CLIP *4 REAR FENDER SPLASH SHIELD SUB-ASSEMBLY RH *5 WINDSHIELD WAS
SEE MORE:
Back Camera Disconnected (C1622)
DESCRIPTION This DTC is stored if the radio receiver assembly judges that the signals or signal lines between the rear television camera assembly and the multi-display assembly are not normal as a result of its self check. DTC No. Detection Item DTC Detection Condition Trouble Area C162
Installation
INSTALLATION PROCEDURE 1. INSTALL TELEPHONE AND GPS ANTENNA BRACKET 2. INSTALL TELEPHONE AND GPS ANTENNA ASSEMBLY (a) Engage the 6 guides and 2 claws to install the telephone and GPS antenna assembly as shown in the illustration. Install in this Direction 3. INSTALL TELEPHONE AND GPS ANTEN
