Lexus ES: Inspection
Lexus ES (XZ10) Service Manual / Steering / Steering Column / Tilt And Telescopic Manual Switch / Inspection
INSPECTION
PROCEDURE
1. INSPECT TILT AND TELESCOPIC SWITCH
(a) Remove the tilt and telescopic switch.
Click here .gif)
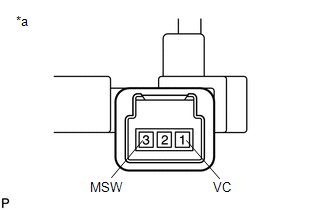
| (b) Measure the resistance according to the value(s) in the table below. Standard Resistance:
If the result is not as specified, replace the tilt and telescopic switch. |
|
READ NEXT:
 Installation
INSTALLATION PROCEDURE 1. INSTALL TILT AND TELESCOPIC SWITCH (a) Engage the claw to install the tilt and telescopic switch. (b) Connect the tilt and telescopic connector to the tilt and telescopic swi
Installation
INSTALLATION PROCEDURE 1. INSTALL TILT AND TELESCOPIC SWITCH (a) Engage the claw to install the tilt and telescopic switch. (b) Connect the tilt and telescopic connector to the tilt and telescopic swi
SEE MORE:
Components
COMPONENTS ILLUSTRATION *A for HV Model *B for Gasoline Model *1 REAR DOOR SCUFF PLATE LH *2 REAR DOOR SCUFF PLATE RH *3 REAR SEAT SIDE GARNISH LH *4 REAR SEAT SIDE GARNISH RH *5 ROOF SIDE INNER GARNISH ASSEMBLY LH *6 ROOF SIDE INNER GARNISH ASSEMBLY RH *7
Inspection
INSPECTION PROCEDURE 1. INSPECT OUTER MIRROR RH (a) Check the outer mirror heater operation. (1) Measure the resistance according to the value(s) in the table below. Standard Resistance: Tester Connection Condition Specified Condition 1 - 2 25°C (77°F) 3.8 to 5.8 Ω If the re
© 2016-2026 Copyright www.lexguide.net
