Lexus ES: Inspection
INSPECTION
PROCEDURE
1. INSPECT BRAKE CYLINDER AND PISTON
(a) Check the front disc brake cylinder bore and front disc brake piston for rust and scoring. If necessary, replace the front disc brake cylinder assembly and front disc brake piston.
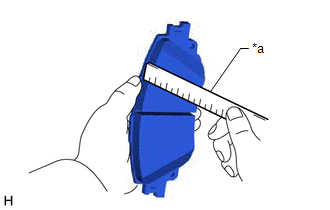
2. INSPECT PAD LINING THICKNESS
| (a) Using a ruler, measure the front disc brake pad lining thickness. Standard Thickness: 11.0 mm (0.433 in.) Minimum Thickness: 1.0 mm (0.0394 in.) HINT:
|
|
3. INSPECT FRONT DISC BRAKE PAD SUPPORT PLATE
(a) Make sure that the front disc brake pad support plates have sufficient rebound, no deformation, cracks or wear, and that all rust and dirt is cleaned off. If necessary, replace the front disc brake pad support plates.
(b) Before installing the front disc brake pads, check that the brake pad support plates have spring force.
4. INSPECT DISC THICKNESS
| (a) Using a micrometer, measure the front disc thickness. Standard Thickness: 28.0 mm (1.10 in.) Minimum Thickness: 25.0 mm (0.984 in.) HINT: If the front disc thickness is less than the minimum thickness, replace the front disc. |
|
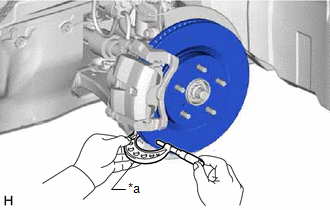
5. INSPECT DISC RUNOUT
(a) Inspect the front axle hub bearing looseness and front axle hub runout.
Click here .gif)
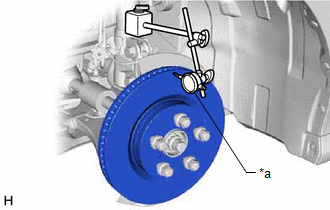
(b) Temporarily install the front disc with the 5 hub nuts.
Torque:
103 N·m {1050 kgf·cm, 76 ft·lbf}
| (c) Using a dial indicator with magnetic base, measure the disc runout 10 mm (0.394 in.) from the outer edge of the front disc. Maximum Disc Runout: 0.05 mm (0.00196 in.) NOTICE: Keep the magnet of the dial indicator free from the front speed sensor. HINT: If the runout exceeds the maximum value, change the installation position of the front disc to minimize the runout. If the runout exceeds the maximum even when the installation position is changed, grind the front disc. If the front disc thickness is less than the minimum, replace the front disc. |
|
(d) Remove the 5 hub nuts and front disc.
READ NEXT:
 Installation
INSTALLATION CAUTION / NOTICE / HINT NOTICE:
Immediately after installing the brake pads, the braking performance may be reduced. Always perform a road test in a safe place while paying attention t
Reassembly
REASSEMBLY PROCEDURE 1. TEMPORARILY TIGHTEN FRONT DISC BRAKE BLEEDER PLUG (a) Temporarily install the front disc brake bleeder plug to the front disc brake cylinder. HINT: Fully tighten the front disc
Removal
REMOVAL CAUTION / NOTICE / HINT The necessary procedures (adjustment, calibration, initialization, or registration) that must be performed after parts are removed and installed, or replaced during fro
SEE MORE:
Components
COMPONENTS ILLUSTRATION *A for Driver Side *B for Front Passenger Side *1 COURTESY LIGHT ASSEMBLY *2 FRONT DOOR TRIM BOARD SUB-ASSEMBLY *3 MULTIPLEX NETWORK MASTER SWITCH ASSEMBLY WITH FRONT DOOR UPPER ARMREST BASE PANEL *4 NO. 2 DOOR TRIM PAD *5 POWER WINDOW REGU
Diagnostic Trouble Code Chart
DIAGNOSTIC TROUBLE CODE CHART Lighting System DTC No. Detection Item DTC Output from Link B1244 Light Sensor Circuit Main Body B124B Automatic High Beam System Main Body B124C Automatic High Beam Camera Main Body B2410 Headlight Swivel ECU LH Com
