Lexus ES: Front Crankshaft Oil Seal
Components
COMPONENTS
ILLUSTRATION
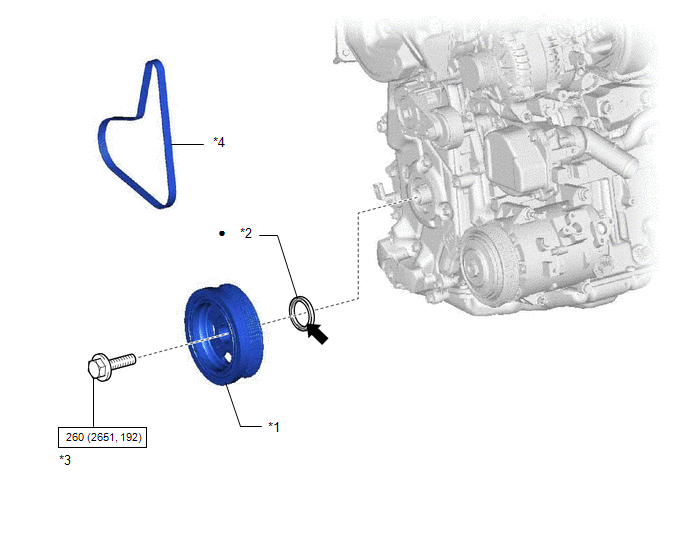
| *1 | CRANKSHAFT PULLEY ASSEMBLY | *2 | TIMING CHAIN COVER OIL SEAL |
| *3 | CRANKSHAFT PULLEY BOLT | *4 | V-RIBBED BELT |
.png) | N*m (kgf*cm, ft.*lbf): Specified torque | ● | Non-reusable part |
.png) | MP grease | - | - |
Installation
INSTALLATION
CAUTION / NOTICE / HINT
NOTICE:
This procedure includes the installation of small-head bolts. Refer to Small-Head Bolts of Basic Repair Hint to identify the small-head bolts.
Click here .gif)
PROCEDURE
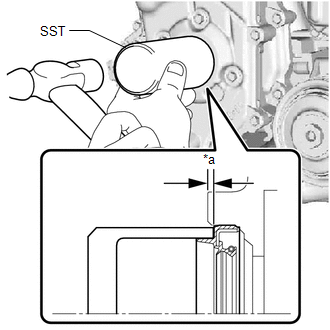
1. INSTALL TIMING CHAIN COVER OIL SEAL
(a) Apply MP grease to the lip of a new timing chain cover oil seal.
NOTICE:
- Keep the lip free from foreign matter.
- Do not allow MP grease to contact the dust seal.
| (b) Using SST and a hammer, tap in the timing chain cover oil seal. SST: 09223-00010 Standard Depth: 0 to 2 mm (0 to 0.0787 in.) (From the edge of the No. 2 timing chain cover assembly) NOTICE: Do not tap in the timing chain cover oil seal at an angle. |
|
2. INSTALL CRANKSHAFT PULLEY ASSEMBLY
Click here
3. INSTALL V-RIBBED BELT
Click here
4. INSTALL ENGINE ASSEMBLY WITH TRANSAXLE
Click here
READ NEXT:
 Rear Crankshaft Oil Seal
ComponentsCOMPONENTS ILLUSTRATION *1 DRIVE PLATE AND RING GEAR SUB-ASSEMBLY *2 REAR ENGINE OIL SEAL *3 NO. 1 CRANKSHAFT POSITION SENSOR PLATE *4 REAR DRIVE PLATE SPACER N*m
SEE MORE:
Fuel Rail Pressure Sensor (Low) Circuit Short to Ground (P107A11)
DESCRIPTION The No. 2 fuel pressure sensor (for low pressure side) replaces the fuel pressure with electrical signals and outputs them to the ECM. The ECM controls the optimal fuel pressure for the operation conditions to reduce the fuel pump power consumption and improve fuel economy. DTC No.
Customize Parameters
CUSTOMIZE PARAMETERS NOTICE:
When the customer requests a change in a function, first make sure that the function can be customized.
Be sure to make a note of the current settings before customizing.
When troubleshooting a function, first make sure that the function is set to the default sett
