Lexus ES: Electronic key battery
Replace the battery with a new one if it is depleted.
■If the electronic key battery is depleted
The following symptoms may occur:
- The smart access system with push-button start and wireless remote control will not function properly.
- The operational range will be reduced.
Items to prepare
Prepare the following before replacing the battery:
- Flathead screwdriver
- Small flathead screwdriver
- Lithium battery CR2032
■Use a CR2032 lithium battery
- Batteries can be purchased at your Lexus dealer, local electrical appliance shops or camera stores.
- Replace only with the same or equivalent type recommended by the manufacturer.
- Dispose of used batteries according to the local laws.
Replacing the battery
1. Take out the mechanical key.
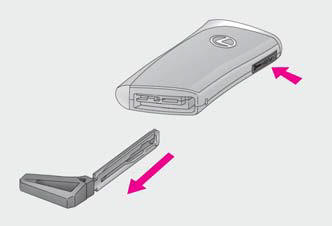
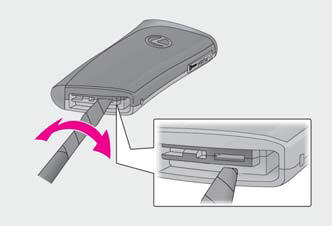
2. Remove the cover.
To prevent damage to the key, wrap the tip of the screwdriver with tape.
3. Remove the depleted battery.
Insert a new battery with the "+" terminal facing up.

WARNING
■Removed battery and other parts These parts are small and if swallowed by a child, they can cause choking. Keep away from children. Failure to do so could result in death or serious injury.
NOTICE
■When replacing the battery Use a screwdriver of appropriate size.
Applying excessive force may deform or damage the cover.
■For normal operation after replacing the battery Observe the following precautions to prevent accidents:
- Always work with dry hands.
Moisture may cause the battery to rust.
- Do not touch or move any other component inside the remote control.
- Do not bend either of the battery terminals.
READ NEXT:
 Checking and replacing fuses
If any of the electrical components
do not operate, a fuse may have
blown. If this happens, check and
replace the fuses as necessary.
Checking and replacing fuses
1. Turn the power switch off.
Headlight aim
Vertical movement adjusting
bolts
Vehicles with single-beam headlights
Adjustment bolt A
Adjustment bolt B
Vehicles with triple-beam headlights
Adjustment bolt A
Adjustment bolt B
Light bulbs
You may replace the following bulb
by yourself. Before replacing,
check the wattage of the light bulb
to be replaced. As there is a danger
that components may be damaged,
we recommend that replac
SEE MORE:
Reassembly
REASSEMBLY PROCEDURE 1. INSTALL FRONT BUMPER SIDE SUPPORT LH (a) Engage the clip as shown in the illustration. Install in this Direction (b) Install the front bumper side support LH with the bolt. Torque: 5.4 N·m {55 kgf·cm, 48 in·lbf} 2. INSTALL FRONT BUMPER SIDE SUPPOR
Torque Converter Clutch Pressure Control Solenoid Control Circuit Short to Ground or Open (P275614)
DESCRIPTION Refer to DTC P275612. Click here DTC No. Detection Item DTC Detection Condition Trouble Area MIL Memory Note P275614 Torque Converter Clutch Pressure Control Solenoid Control Circuit Short to Ground or Open While the vehicle is being driven, a short to ground or
