
Lexus ES: Drive Mode Select Switch Circuit
DESCRIPTION
The characteristics of the electronic throttle and EPS operation change according to operation of the drive mode select switch (combination switch assembly).
WIRING DIAGRAM
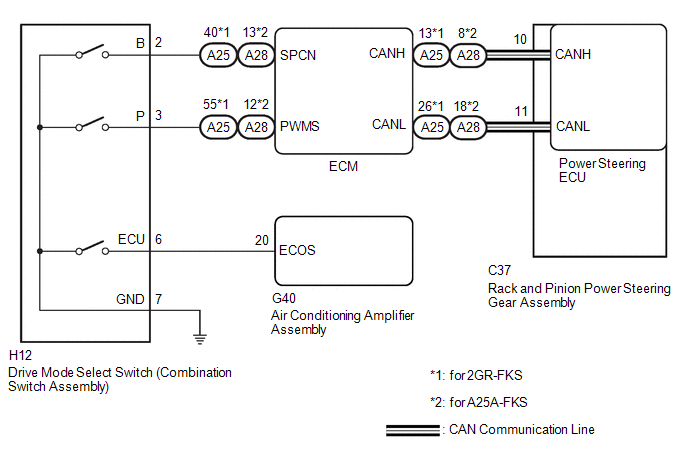
PROCEDURE
| 1. | CHECK THE PROBLEM SYMPTOMS |
(a) Check each symptom by checking the suspected areas in the table below.
| Result | Proceed to |
|---|---|
| SPORT mode or NORMAL mode is abnormal. | A |
| ECO mode is abnormal. | B |
| B | .gif) | GO TO AIR CONDITIONING SYSTEM |
|
.gif)
| 2. | CHECK CAN COMMUNICATION SYSTEM |
(a) Check for DTCs.
Click here .gif)
| Result | Proceed to |
|---|---|
| CAN communication system DTCs are not output. | A |
| CAN communication system DTCs are output. | B |
| B | | GO TO CAN COMMUNICATION SYSTEM |
|
| 3. | CHECK HARNESS AND CONNECTOR (DRIVE MODE SELECT SWITCH (COMBINATION SWITCH ASSEMBLY) - BODY GROUND) |
(a) Turn the engine switch off.
| (b) Disconnect the H12 drive mode select switch (combination switch assembly) connector. |
|
.png)
(c) Measure the resistance according to the value(s) in the table below.
Standard Resistance:
| Tester Connection | Condition | Specified Condition |
|---|---|---|
| H12-7 (GND) - Body ground | Always | Below 1 Ω |
| NG | | REPAIR OR REPLACE HARNESS OR CONNECTOR |
|
| 4. | INSPECT DRIVE MODE SELECT SWITCH (COMBINATION SWITCH ASSEMBLY) |
(a) Inspect drive mode select switch (combination switch assembly).
for UA80E: Click here
for UB80F: Click here
OK:
Drive mode select switch (Combination switch assembly) is normal.
| Result | Proceed to |
|---|---|
| CAN communication system DTCs are not output. (for 2GR-FKS) | A |
| CAN communication system DTCs are not output. (for A25A-FKS) | B |
| CAN communication system DTCs are output. | C |
| B | | GO TO STEP 6 |
| C | | REPLACE COMBINATION SWITCH ASSEMBLY |
|
| 5. | CHECK HARNESS AND CONNECTOR (DRIVE MODE SELECT SWITCH (COMBINATION SWITCH ASSEMBLY) - ECM) |
(a) Connect the H12 drive mode select switch (combination switch assembly) connector.
| (b) Disconnect the A25 ECM connectors. |
|
.png)
(c) Measure the resistance according to the value(s) in the table below.
Standard Resistance:
w/ Adaptive Variable Suspension System| Tester Connection | Condition | Specified Condition |
|---|---|---|
| A25-55 (PWMS) - Body ground | SPORT S/S+ mode switch being turned and held | Below 1 Ω |
| A25-55 (PWMS) - Body ground | SPORT S/S+ mode switch not turned | 10 kΩ or higher |
| A25-40 (SPCN) - Body ground | NORMAL/CUSTOM mode switch being pushed and held | Below 1 Ω |
| A25-40 (SPCN) - Body ground | NORMAL/CUSTOM mode switch not pushed | 10 kΩ or higher |
| Tester Connection | Condition | Specified Condition |
|---|---|---|
| A25-55 (PWMS) - Body ground | SPORT mode switch being turned and held | Below 1 Ω |
| A25-55 (PWMS) - Body ground | SPORT mode switch not turned | 10 kΩ or higher |
| A25-40 (SPCN) - Body ground | NORMAL mode switch being pushed and held | Below 1 Ω |
| A25-40 (SPCN) - Body ground | NORMAL mode switch not pushed | 10 kΩ or higher |
| OK | | REPLACE ECM |
| NG | | REPAIR OR REPLACE HARNESS OR CONNECTOR |
| 6. | CHECK HARNESS AND CONNECTOR (DRIVE MODE SELECT SWITCH (COMBINATION SWITCH ASSEMBLY) - ECM) |
(a) Connect the H12 drive mode select switch (combination switch assembly) connector.
| (b) Disconnect the A28 ECM connectors. |
|
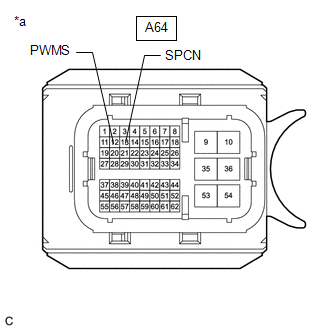
(c) Measure the resistance according to the value(s) in the table below.
Standard Resistance:
| Tester Connection | Condition | Specified Condition |
|---|---|---|
| A28-12 (PWMS) - Body ground | SPORT mode switch being turned and held | Below 1 Ω |
| A28-12 (PWMS) - Body ground | SPORT mode switch not turned | 10 kΩ or higher |
| A28-13 (SPCN) - Body ground | NORMAL mode switch being pushed and held | Below 1 Ω |
| A28-13 (SPCN) - Body ground | NORMAL mode switch not pushed | 10 kΩ or higher |
| OK | | REPLACE ECM |
| NG | | REPAIR OR REPLACE HARNESS OR CONNECTOR |
READ NEXT:
 Check Assist Limit Record
CAUTION / NOTICE / HINT HINT: Perform this troubleshooting procedure when no DTCs are output, including DTCs related to CAN communication system malfunctions. PROCEDURE 1. READ VALUE USING GTS (
SEE MORE:
Rear Power Window RH does not Operate with Rear Power Window Switch RH
DESCRIPTION When the power switch is on (IG), the power window regulator motor assembly (for rear RH door) is operated by the rear power window regulator switch assembly (for RH door). The power window regulator motor assembly (for rear RH door) has motor, regulator, and ECU functions. WIRING DIAGRA
Open Circuit in IG1/IG2 Power Source Circuit (C1242)
DESCRIPTION Refer to DTC C1241. Click here DTC No. Detection Item INF Code DTC Detection Condition Trouble Area MIL Note C1242 Open Circuit in IG1/IG2 Power Source Circuit 111 112
INF Code: 111
When the IG1 terminal voltage is less than 3.5 V, the IG2 terminal volta
