Lexus ES: Disposal
DISPOSAL
PROCEDURE
1. DISPOSE OF FRONT SHOCK ABSORBER ASSEMBLY
CAUTION:
- Always use a cloth to prevent shards of metal flying about due to the release of pressurized gas.
- Always wear safety glasses.
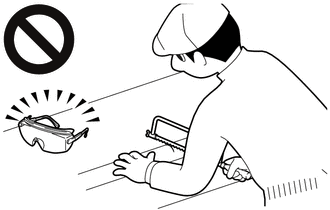
HINT:
The gas is colorless, odorless and non-poisonous.
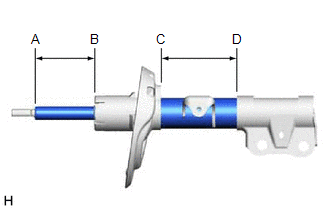
(a) w/o AVS:
| (1) Place the front shock absorber horizontally with the piston rod extended, and using a hacksaw, make a hole between (A) and (B), and between (C) and (D) shown in the illustration to discharge the gas inside. |
|
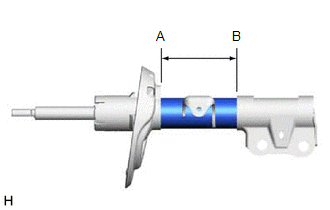
(b) w/ AVS:
| (1) Place the front shock absorber horizontally with the piston rod extended, and using a hacksaw, make a hole between (A) and (B) shown in the illustration to discharge the gas inside. |
|
READ NEXT:
 Components
COMPONENTS ILLUSTRATION *1 FRONT NO. 1 STABILIZER BAR BUSHING *2 FRONT NO. 1 STABILIZER BRACKET LH *3 FRONT NO. 1 STABILIZER BRACKET RH *4 FRONT STABILIZER BAR *5 FRONT STABI
Removal
REMOVAL CAUTION / NOTICE / HINT The necessary procedures (adjustment, calibration, initialization, or registration) that must be performed after parts are removed and installed, or replaced during fro
SEE MORE:
Installation
INSTALLATION PROCEDURE 1. INSTALL REMOTE OPERATION CONTROLLER ASSEMBLY (a) Install the remote operation controller assembly with the 4 screws as shown in the illustration. Install in this Direction 2. INSTALL REAR UPPER CONSOLE PANEL SUB-ASSEMBLY Click here 3. INSTALL SHIFT LEVER KNOB SU
Telescopic Position Sensor or Telescopic Motor Circuit Component Internal Failure (B261196)
DESCRIPTION The telescopic motor (steering column assembly) is operated by the power source voltage supplied from the multiplex tilt and telescopic ECU and slides the steering column assembly forward and backward. The telescopic position sensor (Hall IC) in the telescopic motor (steering column asse
© 2016-2026 Copyright www.lexguide.net
