
Lexus ES: DCM Data Signal Circuit between Navigation ECU and DCM
DESCRIPTION
This circuit is used to send and receive signals between the DCM (Telematics Transceiver), radio receiver assembly and navigation ECU.
WIRING DIAGRAM

PROCEDURE
| 1. | CHECK HARNESS AND CONNECTOR (RADIO RECEIVER ASSEMBLY - DCM (TELEMATICS TRANSCEIVER)) |
(a) Disconnect the G128 DCM (Telematics Transceiver) connector.
(b) Disconnect the G1 radio receiver assembly connector.
(c) Measure the resistance according to the value(s) in the table below.
Standard Resistance:
| Tester Connection | Condition | Specified Condition |
|---|---|---|
| G128-31 (USBG) - G1-11 (USBG) | Always | Below 1 Ω |
| G128-17 (VOT+) - G1-13 (VOR+) | Always | Below 1 Ω |
| G128-15 (USBV) - G1-10 (USBV) | Always | Below 1 Ω |
| G128-33 (VOT-) - G1-14 (VOR-) | Always | Below 1 Ω |
| G128-34 (VOR-) - G1-16 (VOT-) | Always | Below 1 Ω |
| G128-18 (VOR+) - G1-15 (VOT+) | Always | Below 1 Ω |
| G128-31 (USBG) or G1-11 (USBG) - Body ground | Always | 10 kΩ or higher |
| G128-17 (VOT+) or G1-13 (VOR+) - Body ground | Always | 10 kΩ or higher |
| G128-15 (USBV) or G1-10 (USBV) - Body ground | Always | 10 kΩ or higher |
| G128-33 (VOT-) or G1-14 (VOR-) - Body ground | Always | 10 kΩ or higher |
| G128-34 (VOR-) or G1-16 (VOT-) - Body ground | Always | 10 kΩ or higher |
| G128-18 (VOR+) or G1-15 (VOT+) - Body ground | Always | 10 kΩ or higher |
| NG | .gif) | REPAIR OR REPLACE HARNESS OR CONNECTOR |
|

| 2. | CHECK HARNESS AND CONNECTOR (NAVIGATION ECU - DCM (TELEMATICS TRANSCEIVER)) |
| (a) Disconnect the G130 DCM (Telematics Transceiver) connector. |
|
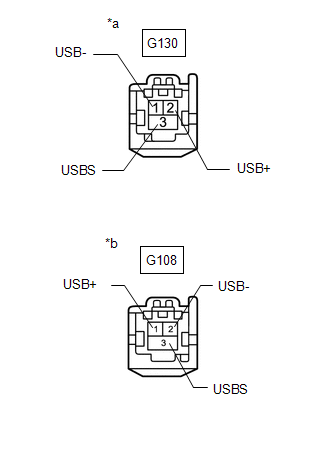
(b) Disconnect the G108 navigation ECU connector.
(c) Measure the resistance according to the value(s) in the table below.
Standard Resistance:
| Tester Connection | Condition | Specified Condition |
|---|---|---|
| G130-1 (USB-) - G108-2 (USB-) | Always | Below 1 Ω |
| G130-2 (USB+) - G108-1 (USB+) | Always | Below 1 Ω |
| G130-3 (USBS) - G108-3 (USBS) | Always | Below 1 Ω |
| G130-1 (USB-) or G108-2 (USB-) - Body ground | Always | 10 kΩ or higher |
| G130-2 (USB+) or G108-1 (USB+) - Body ground | Always | 10 kΩ or higher |
| G130-3 (USBS) or G108-3 (USBS) - Body ground | Always | 10 kΩ or higher |
| OK | | PROCEED TO NEXT SUSPECTED AREA SHOWN IN PROBLEM SYMPTOMS TABLE |
| NG | | REPAIR OR REPLACE HARNESS OR CONNECTOR |
READ NEXT:
 Does not Recognize Voice Commands Performed to Contact Support Center
PROCEDURE 1. CHECK COMMUNICATION BASED VOICE RECOGNITION FUNCTION (a) While paying attention to the condition of the spoken voice command, say "Find a gas station in New York" and check that
How To Proceed With Troubleshooting
CAUTION / NOTICE / HINT HINT:
Use the following procedure to troubleshoot the LEXUS ENFORM system.
*: Use the Techstream.
PROCEDURE 1. VEHICLE BROUGHT TO WORKSHOP
NEXT
Operation Check
OPERATION CHECK LEXUS APP SUITE RESET PROCEDURE (a) Duplicate the problem symptom. (b) Check for DTCs and repair the systems for which any DTCs are output. Click here (c) Check cellular phone compa
SEE MORE:
Power Trunk Lid does not Operate Using Kick Sensor Operation
DESCRIPTION The kick door control sensor receives vehicle speed, IG and ACC signals from the main body ECU (multiplex network body ECU) via LIN communication and uses the information to stop sensor oscillation. When the kick door control sensor detects a kick operation, it sends an operation signal
Components
COMPONENTS ILLUSTRATION *A w/ Silencer Sheet - - *1 FUEL PUMP CONTROL ECU *2 FUEL PUMP CONTROL ECU BRACKET *3 REAR SEAT SIDE GARNISH LH *4 REAR DOOR SCUFF PLATE LH *5 ROOM PARTITION PANEL INSULATOR *6 NO. 2 ROOM PARTITION PANEL SILENCER SHEET N*m (kgf*c
