Lexus ES: Customization
Customizable features
Your vehicle includes a variety of electronic features that can be personalized to your preferences. The settings of these features can be changed by using the meter control switches, the Remote Touch or at your Lexus dealer.
Customizing vehicle features
■ Changing by using the meter control switches
1. Press  or
or
 to select
  .
.
2. Operate the meter control switches to select the desired item to be customized.
3. According to the display, select the desired setting.
To go back to the previous screen or exit
the customize mode, press  .
.
■ Changing by using the Remote Touch
1. Press the "MENU" button on the Remote Touch.
2. Select "Setup" on the menu screen and select "Vehicle".
3. Select "Vehicle Customization".
Various setting can be changed. Refer to the list of settings that can be changed for details.
For details on the Remote Touch, refer to the "NAVIGATION AND MULTIMEDIA SYSTEM OWNER'S MANUAL".
■When customizing using the Remote Touch Stop the vehicle in a safe place, apply the parking brake, and shift the shift lever to P.
Also, to prevent 12-volt battery discharge, leave the hybrid system operating while customizing the features.
WARNING
■During customization As the hybrid system needs to be operating during customization, ensure that the vehicle is parked in a place with adequate ventilation. In a closed area such as a garage, exhaust gases including harmful carbon monoxide (CO) may collect and enter the vehicle. This may lead to death or a serious health hazard.
NOTICE
■During customization To prevent 12-volt battery discharge, ensure that the hybrid system is operating while customizing features.
Customizable features
Some function settings are changed simultaneously with other functions being customized.
Contact your Lexus dealer for further details.
- Settings that can be changed using the Remote Touch
- Settings that can be changed using the meter control switches
- Settings that can be changed by your Lexus dealer
Definition of symbols: O = Available, - = Not available
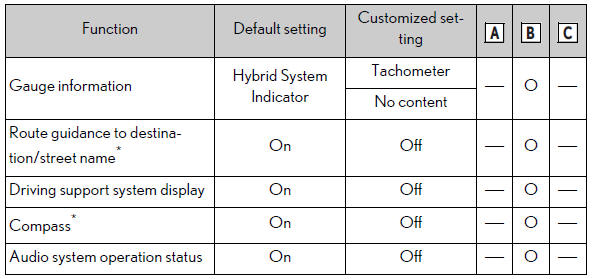
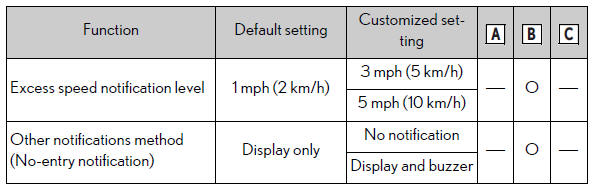
■ Gauges, meters and multi-information display
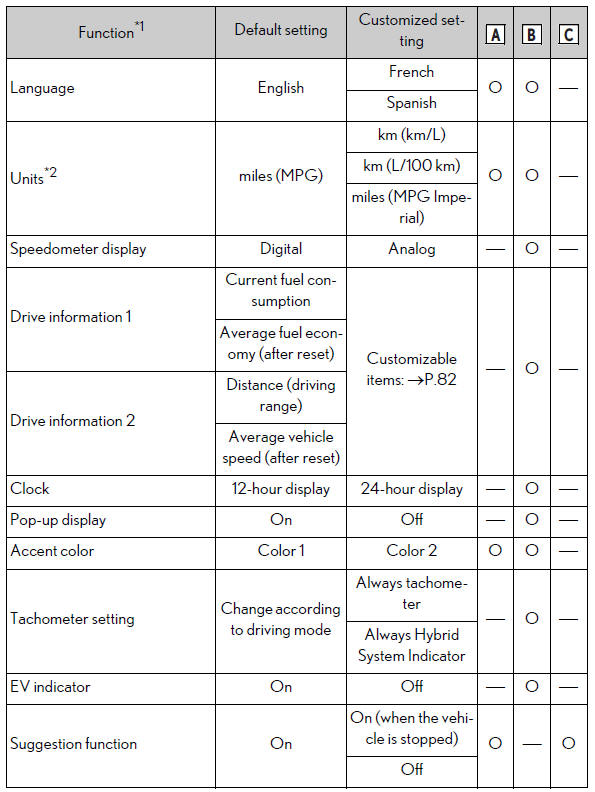
*1: For details about each function
*2: The default setting varies according to country.
■ Head-up Display*
*: If equipped
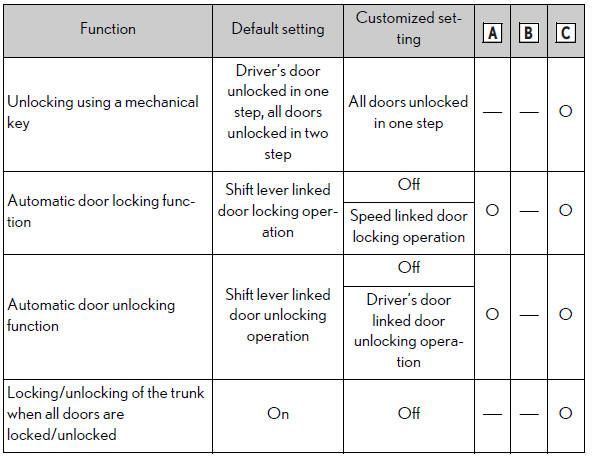
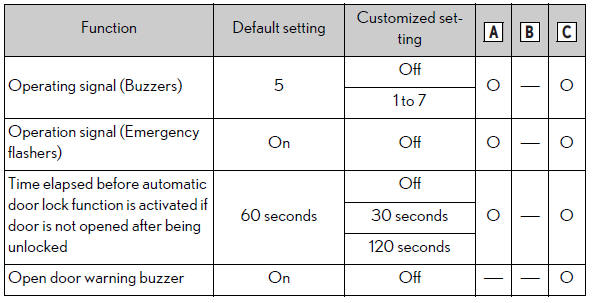
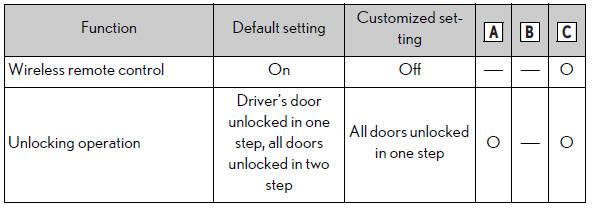
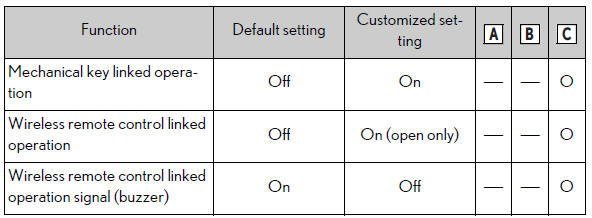
■ Door lock
■ Smart access system with push-button start and wireless remote control
■ Smart access system with push-button start

■ Wireless remote control
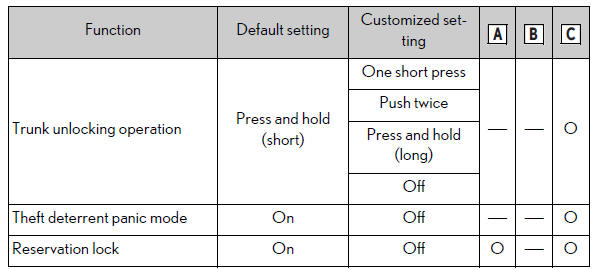
■ Trunk

*: If equipped
■ Driving position memory*
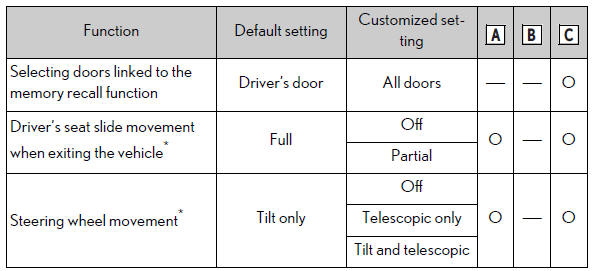
*: If equipped
■ Outside rear view mirrors

*: If equipped
■ Power windows and moon roof
■ Automatic light control system
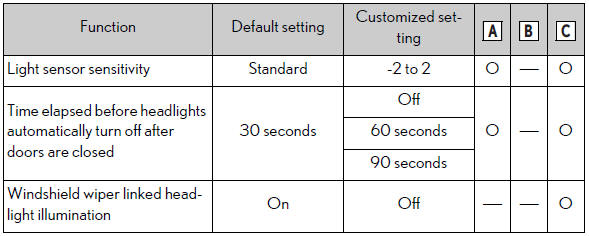
■ Lights

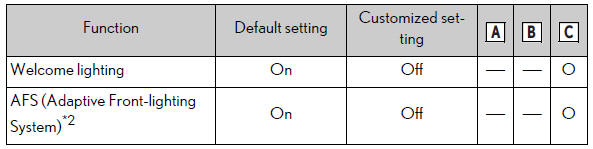
*1: Except for Canada
*2: If equipped
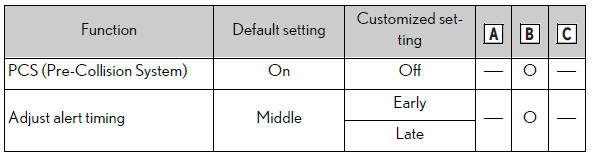
■ PCS (Pre-Collision System)
■ LTA (Lane Tracing Assist)

■ RSA (Road Sign Assist)*
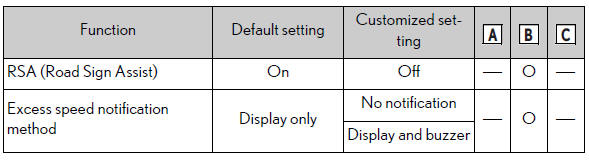
*: If equipped
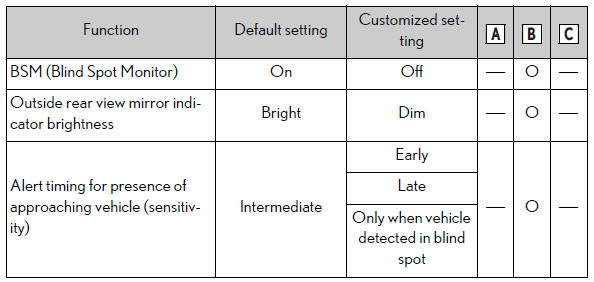
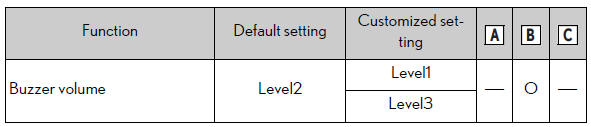
■ BSM (Blind Spot Monitor)*
*: If equipped
■ PKSA (Parking Support Alert)
■ Intuitive parking assist*

*: If equipped
■ RCTA (Rear Cross Traffic Alert) function*

*: If equipped
■ RCD (Rear Camera Detection) function*

*: If equipped
■ PKSB (Parking Support Brake)*

*: If equipped
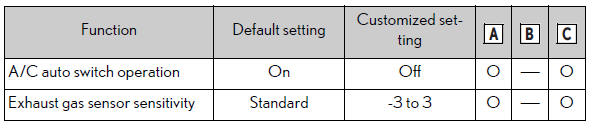
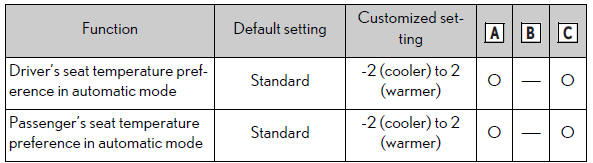
■ Automatic air conditioning system
■ Seat heater*/seat ventilators*
*: If equipped
■ Heated steering wheel*

*: If equipped
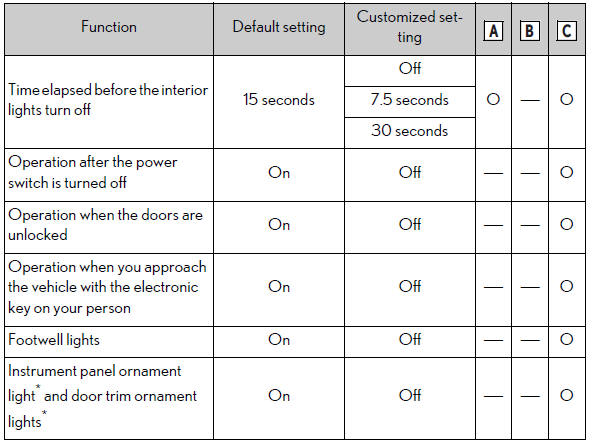
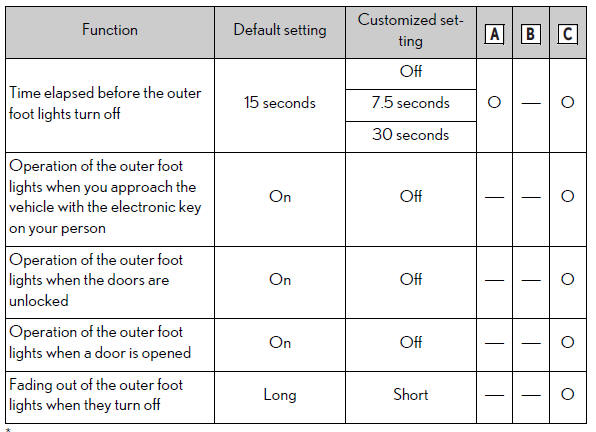
■ Illumination
*: If equipped
■Vehicle customization
- When the smart access system with push-button start is off, the entry unlock function cannot be customized.
- When the doors remain closed after unlocking the doors and the timer activated automatic door lock function activates, signals will be generated in accordance with the operation buzzer volume and operational signal (Emergency flashers) function settings.
- Some settings can be changed using a switch or the Center Display. If a setting is changed using a switch, the changed setting will not be reflected on the Center Display until the power switch is turned off and then to ON mode.
■Clock settings screen If the clock adjustment screen is displayed continuously when attempting to change the clock settings, the system may be malfunctioning.
Have the vehicle inspected by your Lexus dealer.
Items to initialize
The following items must be initialized for normal system operation after such cases as the 12-volt battery being reconnected, or maintenance being performed on the vehicle:
List of the items to initialize
| Item | When to initialize |
| Intuitive parking assist* | After reconnecting or changing the 12-volt battery |
| PKSB (Parking Support Brake)* | After reconnecting or changing the 12-volt battery |
| Tire pressure warning system |
|
| Power windows | When functioning abnormally |
| Lexus parking assist monitor* |
|
| Panoramic view monitor* |
|
| Message indicating maintenance is required | After the maintenance is performed |
| Oil maintenance | After the maintenance is performed |
*: If equipped
READ NEXT:
 For owners
Reporting safety defects for U.S. owners
If you believe that your vehicle has a
defect which could cause a crash or
could cause injury or death, you
should immediately inform the
National Highw
Lexus ES (XZ10) Service Manual
Workshop (Service) Manual for Seventh generation Lexus ES 350 (GSZ10). All ES models comes standard with Lexus Safety System+ 2.0 that includes Pre-Collision System (PCS) with Pedestrian Detection, La
General
h1 {color:red;} h2 {color:blue;} h3 {color:green;}
SEE MORE:
Mirror Heater does not Operate with Rear Defogger Switch
DESCRIPTION When the mirror heater switch (rear window defogger switch) on the air conditioning control assembly is pressed, the operation signal is sent to the air conditioning amplifier assembly via LIN communication. When the air conditioning amplifier assembly receives the signal, it turns on th
Open in Bus 2 Main Bus Line
DESCRIPTION There may be an open circuit in one of the CAN main bus lines when the resistance between terminals 18 (CA4H) and 17 (CA4L) of the central gateway ECU (network gateway ECU) is 70 Ω or higher. Symptom Trouble Area Resistance between terminals 18 (CA4H) and 17 (CA4L) of the centr
