Lexus ES: Components
COMPONENTS
ILLUSTRATION
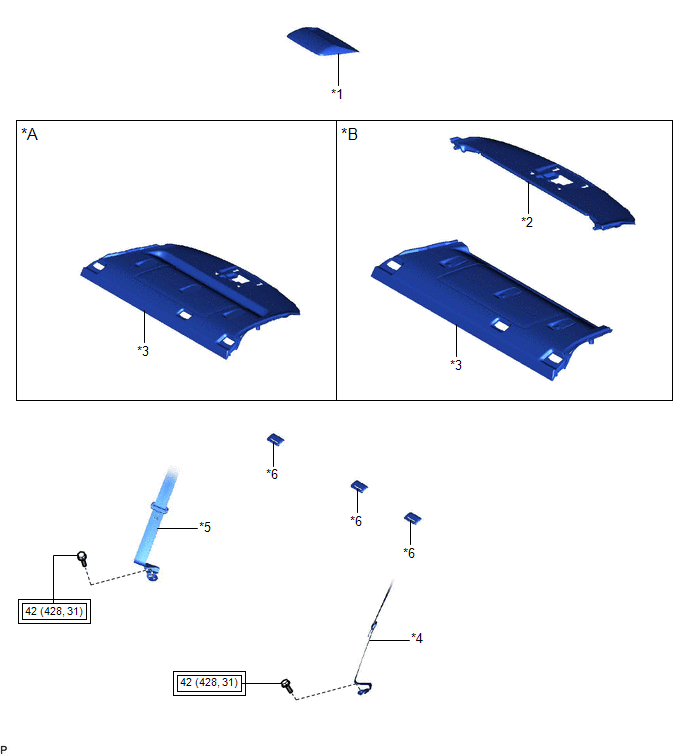
| *A | w/o Rear Sunshade | *B | w/ Rear Sunshade |
| *1 | CENTER STOP LIGHT SET | *2 | NO. 2 PACKAGE TRAY TRIM PANEL ASSEMBLY |
| *3 | PACKAGE TRAY TRIM PANEL ASSEMBLY | *4 | REAR SEAT OUTER BELT ASSEMBLY LH |
| *5 | REAR SEAT OUTER BELT ASSEMBLY RH | *6 | REAR SEAT SHOULDER BELT COVER |
.png) | Tightening torque for "Major areas involving basic vehicle performance such as moving/turning/stopping": N*m (kgf*cm, ft.*lbf) | - | - |
ILLUSTRATION
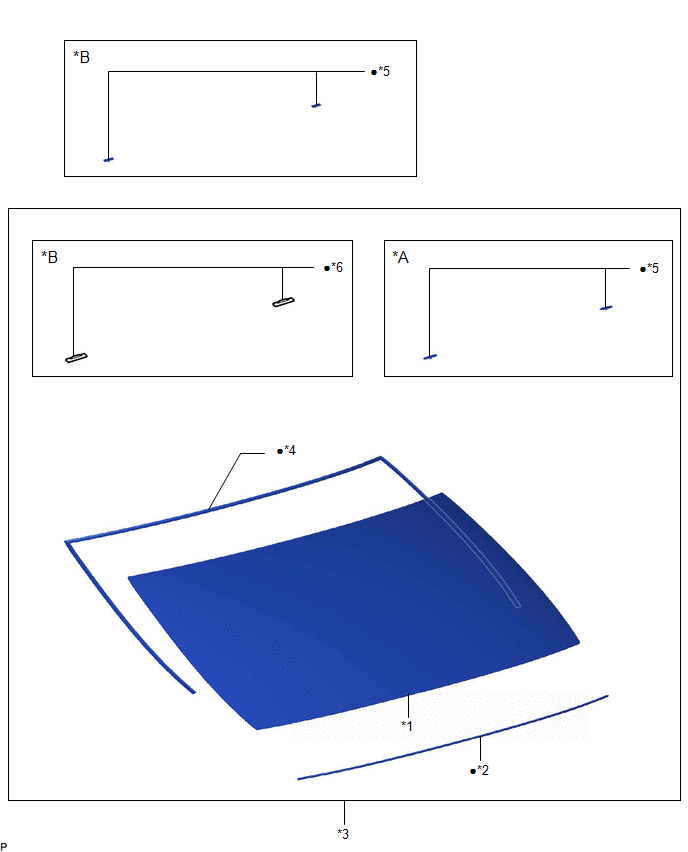
| *A | for 1-piece Type | *B | for 2-piece Type |
| *1 | BACK WINDOW GLASS | *2 | BACK WINDOW GLASS ADHESIVE DAM |
| *3 | BACK WINDOW GLASS SUB-ASSEMBLY | *4 | BACK WINDOW OUTSIDE MOULDING |
| *5 | NO. 1 BACK WINDOW GLASS STOPPER | *6 | NO. 2 BACK WINDOW GLASS STOPPER |
| ● | Non-reusable part | - | - |
READ NEXT:
 Removal
REMOVAL CAUTION / NOTICE / HINT The necessary procedures (adjustment, calibration, initialization or registration) that must be performed after parts are removed and installed, or replaced during back
Installation
INSTALLATION PROCEDURE 1. INSTALL NO. 1 BACK WINDOW GLASS STOPPER (for 2-piece Type) (a) Install 2 new No. 1 back window glass stoppers to the vehicle body as shown in the illustration. HINT: Only
Front Passenger Side Power Window Switch
ComponentsCOMPONENTS ILLUSTRATION *1 POWER WINDOW REGULATOR SWITCH ASSEMBLY *2 POWER WINDOW REGULATOR SWITCH ASSEMBLY WITH FRONT DOOR UPPER ARMREST BASE PANEL RemovalREMOVAL PROCEDURE 1
SEE MORE:
Removal
REMOVAL CAUTION / NOTICE / HINT The necessary procedures (adjustment, calibration, initialization, or registration) that must be performed after parts are removed and installed, or replaced during rear axle hub and bearing assembly removal/installation are shown below. Necessary Procedures After Par
Reassembly
REASSEMBLY PROCEDURE 1. INSTALL PLANETARY GEAR (a) Apply high-temperature grease to the 3 planetary gears, 3 planetary gear shafts and repair service starter kit. High-temperature Grease (b) Install the 3 planetary gears to the repair service starter kit. 2. INSTALL RUBBER SEAL (a) Install
© 2016-2026 Copyright www.lexguide.net
