Lexus ES: Components
COMPONENTS
ILLUSTRATION
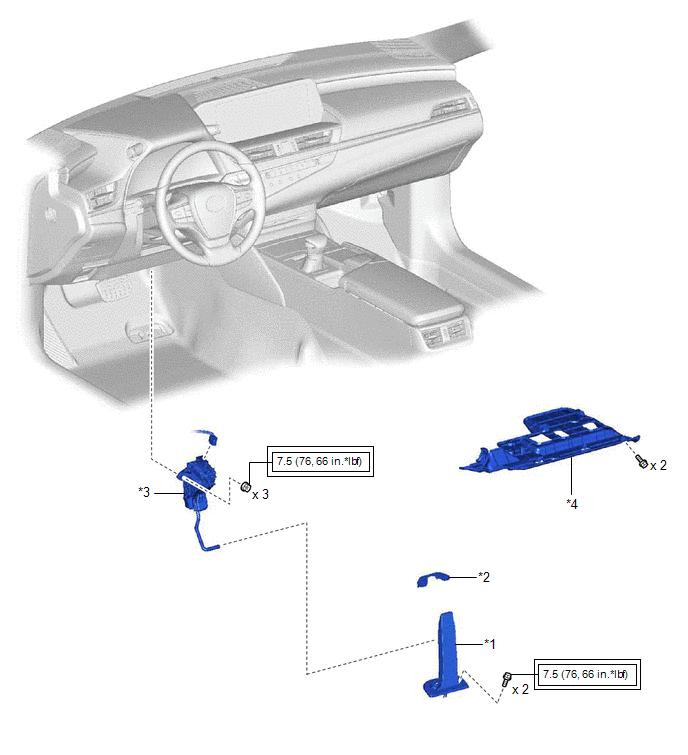
| *1 | ACCELERATOR PEDAL ASSEMBLY | *2 | ACCELERATOR PEDAL PAD |
| *3 | ACCELERATOR PEDAL SENSOR ASSEMBLY | *4 | NO. 1 INSTRUMENT PANEL UNDER COVER SUB-ASSEMBLY |
.png) | Tightening torque for "Major areas involving basic vehicle performance such as moving/turning/stopping": N*m (kgf*cm, ft.*lbf) | - | - |
READ NEXT:
 On-vehicle Inspection
ON-VEHICLE INSPECTION PROCEDURE 1. INSPECT ACCELERATOR PEDAL SENSOR ASSEMBLY (a) Connect the Techstream to the DLC3. (b) Turn the power switch on (IG). (c) Turn the Techstream on. (d) Enter the follow
Removal
REMOVAL PROCEDURE 1. REMOVE NO. 1 INSTRUMENT PANEL UNDER COVER SUB-ASSEMBLY Click here 2. REMOVE ACCELERATOR PEDAL(W/SENSOR) ROD ASSEMBLY NOTICE:
Avoid physical shock to the accelerator pedal se
Installation
INSTALLATION PROCEDURE 1. INSTALL ACCELERATOR PEDAL ASSEMBLY (a) Engage the claw to install the accelerator pedal assembly. (b) Install the 2 bolts. Torque: 7.5 N·m {76 kgf·cm, 66 in
SEE MORE:
Diagnostic Trouble Code Chart
DIAGNOSTIC TROUBLE CODE CHART HEATED STEERING WHEEL SYSTEM DTC No. Detection Item Link B14B7 Lost Communication with Steering Heater ECU
Pressure Control Solenoid "H" Circuit Short to Battery (P281612)
DESCRIPTION Changing gears is performed by the ECM turning the solenoid (SL1, SL2, SL3, SL4, SL5 and SL6) valves on and off. If an open or short occurs in any of the solenoid valve circuits, the ECM controls the remaining normal solenoid valves to allow the vehicle to be driven. If all of the soleno
© 2016-2026 Copyright www.lexguide.net
