
Lexus ES: Components
COMPONENTS
ILLUSTRATION
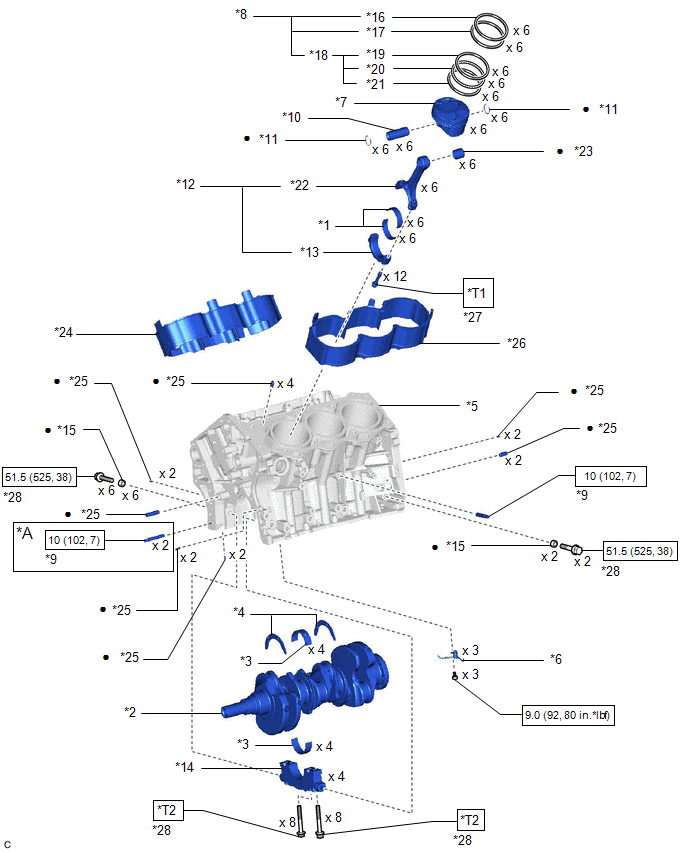
| *A | w/ Stud Bolt | - | - |
| *1 | CONNECTING ROD BEARING | *2 | CRANKSHAFT |
| *3 | CRANKSHAFT BEARING | *4 | CRANKSHAFT THRUST WASHER SET |
| *5 | CYLINDER BLOCK SUB-ASSEMBLY | *6 | NO. 1 OIL NOZZLE SUB-ASSEMBLY |
| *7 | PISTON | *8 | PISTON RING SET |
| *9 | STUD BOLT | *10 | PISTON PIN |
| *11 | PISTON PIN HOLE SNAP RING | *12 | CONNECTING ROD SUB-ASSEMBLY |
| *13 | CONNECTING ROD CAP | *14 | CRANKSHAFT BEARING CAP |
| *15 | SEAL WASHER | *16 | NO. 1 COMPRESSION RING |
| *17 | NO. 2 COMPRESSION RING | *18 | OIL RING |
| *19 | UPPER SIDE RAIL | *20 | OIL RING EXPANDER |
| *21 | LOWER SIDE RAIL | *22 | CONNECTING ROD |
| *23 | CONNECTING ROD SMALL END BUSH | *24 | CYLINDER BLOCK WATER JACKET SPACER |
| *25 | STRAIGHT PIN | *26 | CYLINDER BLOCK WATER JACKET SPACER LH |
| *27 | CONNECTING ROD BOLT | *28 | CRANKSHAFT BEARING CAP SET BOLT |
.png) | N*m (kgf*cm, ft.*lbf): Specified torque | ● | Non-reusable part |
| *T1 | 1st: 24.5 (250, 18) 2nd: Turn 90° | *T2 | 1st: 61 (622, 45) 2nd: Turn 90° |
READ NEXT:
 Disassembly
DISASSEMBLY CAUTION / NOTICE / HINT The necessary procedures (adjustment, calibration, initialization or registration) that must be performed after parts are removed and installed, or replaced during
Inspection
INSPECTION PROCEDURE 1. INSPECT CONNECTING ROD THRUST CLEARANCE (a) Install the connecting rod cap. Click here (b) Using a dial indicator, measure the thrust clearance while moving the connecting
Replacement
REPLACEMENT PROCEDURE 1. REPLACE STRAIGHT PIN NOTICE: If a straight pin is deformed, replace it. (a) Using a plastic hammer, tap in new straight pins to the cylinder block sub-assembly. *a Front
SEE MORE:
Fail-safe Chart
FAIL-SAFE CHART DTC Trouble Area Parking Brake Indicator Light (Red) Brake System Warning Light (Yellow) Fail-safe Deactivation Condition C059704 Skid control ECU (brake actuator assembly) internal malfunction Normal Illuminates After returning to normal condition, turn engine
Installation
INSTALLATION PROCEDURE 1. INSTALL WATER INLET WITH THERMOSTAT SUB-ASSEMBLY (a) Install a new gasket to the water inlet with thermostat sub-assembly. (b) Install the water inlet with thermostat sub-assembly with the 2 bolts and 2 nuts. Torque: 10 N·m {102 kgf·cm, 7 ft·lbf} 2. CONNECT WATER BY-PAS
