Lexus ES: Components
Lexus ES (XZ10) Service Manual / Engine & Hybrid System / 2gr-fks (engine Control) / Ecm / Components
COMPONENTS
ILLUSTRATION
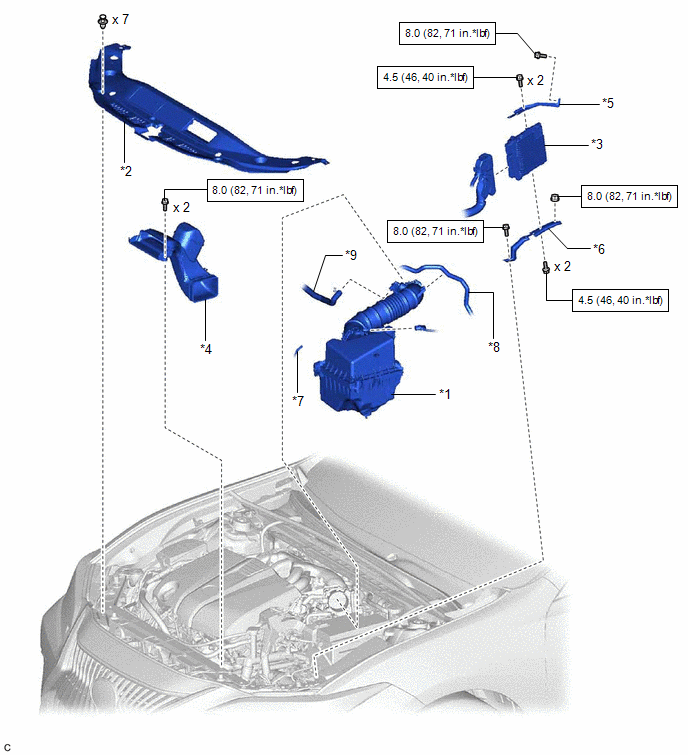
| *1 | AIR CLEANER ASSEMBLY WITH AIR CLEANER HOSE | *2 | COOL AIR INTAKE DUCT SEAL |
| *3 | ECM | *4 | INLET AIR CLEANER ASSEMBLY |
| *5 | NO. 1 ECM BRACKET | *6 | NO. 2 ECM BRACKET |
| *7 | VACUUM HOSE | *8 | NO. 1 FUEL VAPOR FEED HOSE |
| *9 | NO. 2 VENTILATION HOSE | - | - |
.png) | N*m (kgf*cm, ft.*lbf): Specified torque | - | - |
READ NEXT:
 Removal
REMOVAL CAUTION / NOTICE / HINT The necessary procedures (adjustment, calibration, initialization or registration) that must be performed after parts are removed and installed, or replaced during ECM
Installation
INSTALLATION PROCEDURE 1. INSTALL NO. 2 ECM BRACKET (a) Install the No. 2 ECM bracket to the ECM with the 2 screws. Torque: 4.5 N·m {46 kgf·cm, 40 in·lbf} 2. INSTALL NO. 1 ECM BRACKET (a) Install
SEE MORE:
Installation
INSTALLATION PROCEDURE 1. INSTALL HV BATTERY JUNCTION BLOCK ASSEMBLY CAUTION: Be sure to wear insulated gloves and protective goggles. (a) Install the HV battery junction block assembly to the HV battery with the 4 nuts. Torque: 7.5 N·m {76 kgf·cm, 66 in·lbf} NOTICE: If the HV battery junction b
Shift Paddle Switch Circuit
DESCRIPTION Moving the shift lever to S enables the shift range to be selected. The shift range can be selected by operating the "+" or "-" shift paddle switch. WIRING DIAGRAM CAUTION / NOTICE / HINT NOTICE: After turning the power switch off, waiting time may be required before disconnecting the c
© 2016-2026 Copyright www.lexguide.net
