Lexus ES: Components
COMPONENTS
ILLUSTRATION
.png)
| *1 | BATTERY CLAMP SUB-ASSEMBLY | - | - |
.png) | N*m (kgf*cm, ft.*lbf): Specified torque | - | - |
ILLUSTRATION
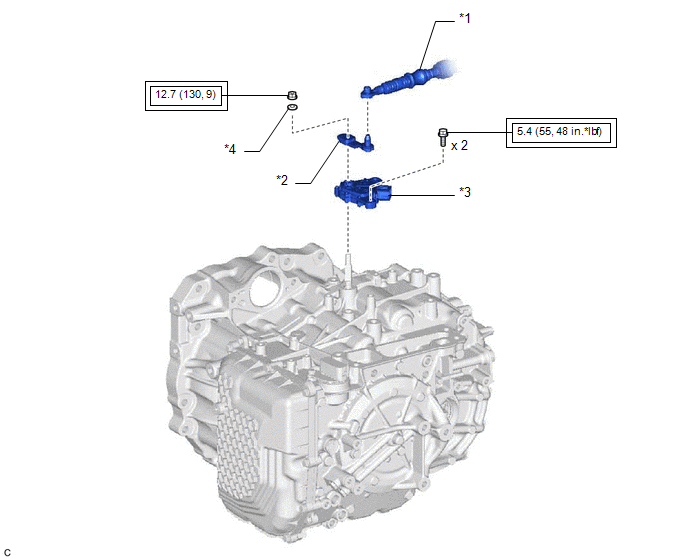
| *1 | TRANSMISSION CONTROL CABLE ASSEMBLY | *2 | TRANSMISSION CONTROL SHAFT LEVER |
| *3 | PARK/NEUTRAL POSITION SWITCH ASSEMBLY | *4 | WASHER |
.png) | Tightening torque for "Major areas involving basic vehicle performance such as moving/turning/stopping": N*m (kgf*cm, ft.*lbf) | - | - |
READ NEXT:
 Inspection
INSPECTION PROCEDURE 1. INSPECT PARK/NEUTRAL POSITION SWITCH ASSEMBLY (a) Measure the resistance according to the value(s) in the table below when the transmission control shaft lever is moved to e
Installation
INSTALLATION PROCEDURE 1. INSTALL PARK/NEUTRAL POSITION SWITCH ASSEMBLY (a) Temporarily install the park/neutral position switch assembly to the automatic transaxle case sub-assembly with the 2 bolts.
On-vehicle Inspection
ON-VEHICLE INSPECTION PROCEDURE 1. SECURE VEHICLE (a) Fully apply the parking brake and chock a wheel. CAUTION:
Make sure to apply the parking brake and chock a wheel before performing this procedu
SEE MORE:
Components
COMPONENTS ILLUSTRATION *1 ENGINE WIRE *2 HV AIR CONDITIONING WIRE *3 STARTER HOLE INSULATOR *4 FLYWHEEL HOUSING SIDE COVER *5 FUEL DELIVERY GUARD *6 STEERING GEAR HEAT INSULATOR N*m (kgf*cm, ft.*lbf): Specified torque - - ILLUSTRATION *1 FRONT FRAME
Reverse Signal Circuit
DESCRIPTION The multi-display receives a reverse signal from the BK UP LP relay*1 or clearance warning ECU assembly*2.
*1: w/o Parking Support Alert System
*2: w/ Parking Support Alert System
WIRING DIAGRAM for 8 inch display for 12.3 inch display w/ Parking Support Alert System CAUTION /
© 2016-2026 Copyright www.lexguide.net
