Lexus ES: Components
COMPONENTS
ILLUSTRATION
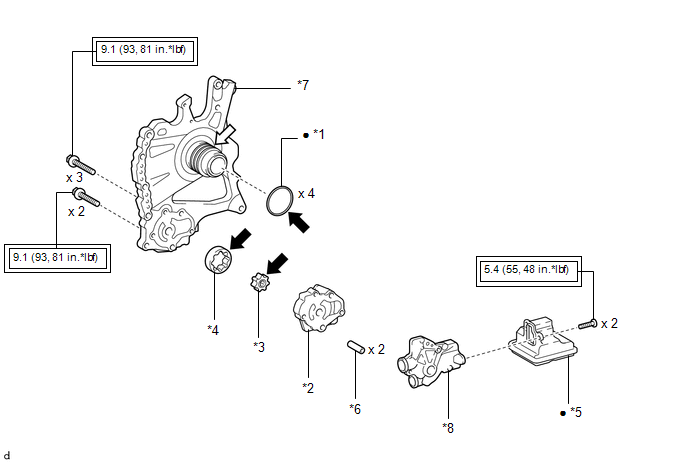
| *1 | CLUTCH DRUM OIL SEAL RING | *2 | FRONT OIL PUMP BODY |
| *3 | FRONT OIL PUMP DRIVE GEAR | *4 | FRONT OIL PUMP DRIVEN GEAR |
| *5 | OIL STRAINER ASSEMBLY | *6 | RING PIN |
| *7 | STATOR SHAFT ASSEMBLY | *8 | FRONT OIL PUMP COVER SUB-ASSEMBLY |
.png) | Tightening torque for "Major areas involving basic vehicle performance such as moving/turning/stopping": N*m (kgf*cm, ft.*lbf) | ● | Non-reusable part |
.png) | Toyota Genuine ATF WS | .png) | MP grease |
READ NEXT:
 Disassembly
DISASSEMBLY PROCEDURE 1. REMOVE CLUTCH DRUM OIL SEAL RING (a) Remove the 4 clutch drum oil seal rings from the stator shaft assembly. 2. REMOVE OIL STRAINER ASSEMBLY (a) Using a T30
Inspection
INSPECTION PROCEDURE 1. INSPECT FRONT OIL PUMP ASSEMBLY (a) Install the oil pump drive shaft sub-assembly to the front oil pump assembly. NOTICE:
To avoid damaging the bush of the front oil pu
Reassembly
REASSEMBLY PROCEDURE 1. INSTALL RING PIN (a) Install the 2 ring pins to the front oil pump cover sub-assembly. 2. INSTALL FRONT OIL PUMP BODY (a) Install the front oil pump body to t
SEE MORE:
Brake Switch "A" Signal Compare Failure (P057162)
DESCRIPTION When the brake pedal is depressed, the stop light switch assembly outputs a signal to the hybrid vehicle control ECU. The hybrid vehicle control ECU uses this signal to control cancellation of vehicle speed by the dynamic radar cruise control. When the hybrid vehicle control ECU determin
Error in Matching of ECUs (C1567)
DESCRIPTION The power steering ECU (rack and pinion power steering gear assembly) determines whether an incompatible ECM or skid control ECU (brake actuator assembly) is installed based on the identification information. DTC No. Detection Item DTC Detection Condition Trouble Area Warning
© 2016-2026 Copyright www.lexguide.net
