Lexus ES: Components
COMPONENTS
ILLUSTRATION
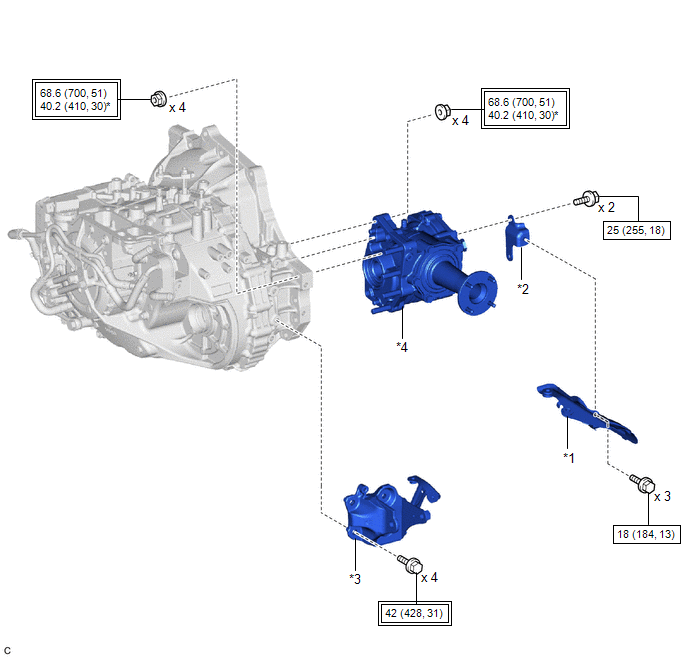
| *1 | PROPELLER SHAFT HEAT INSULATOR | *2 | NO. 1 PROPELLER SHAFT HEAT INSULATOR BRACKET SUB-ASSEMBLY |
| *3 | REAR ENGINE MOUNTING BRACKET SUB-ASSEMBLY | *4 | TRANSFER ASSEMBLY |
.png) | Tightening torque for "Major areas involving basic vehicle performance such as moving/turning/stopping": N*m (kgf*cm, ft.*lbf) | .png) | N*m (kgf*cm, ft.*lbf): Specified torque |
| * | For use with SST and a union nut wrench | - | - |
ILLUSTRATION
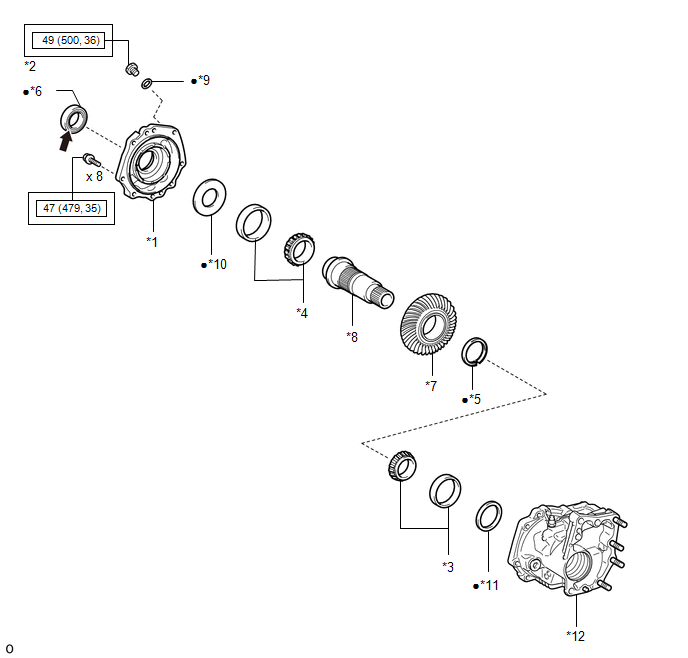
| *1 | NO. 1 TRANSFER CASE COVER | *2 | NO. 1 TRANSFER CASE PLUG |
| *3 | RING GEAR MOUNTING CASE BEARING LH | *4 | RING GEAR MOUNTING CASE BEARING RH |
| *5 | SHAFT SNAP RING | *6 | TRANSFER CASE OIL SEAL RH |
| *7 | TRANSFER RING GEAR | *8 | TRANSFER RING GEAR MOUNTING CASE |
| *9 | GASKET | *10 | NO. 2 TRANSFER RING GEAR MOUNTING CASE WASHER |
| *11 | NO. 1 RING GEAR MOUNTING CASE WASHER | *12 | TRANSFER CASE |
| | Tightening torque for "Major areas involving basic vehicle performance such as moving/turning/stopping": N*m (kgf*cm, ft.*lbf) | ● | Non-reusable part |
.png) | MP grease | - | - |
ILLUSTRATION
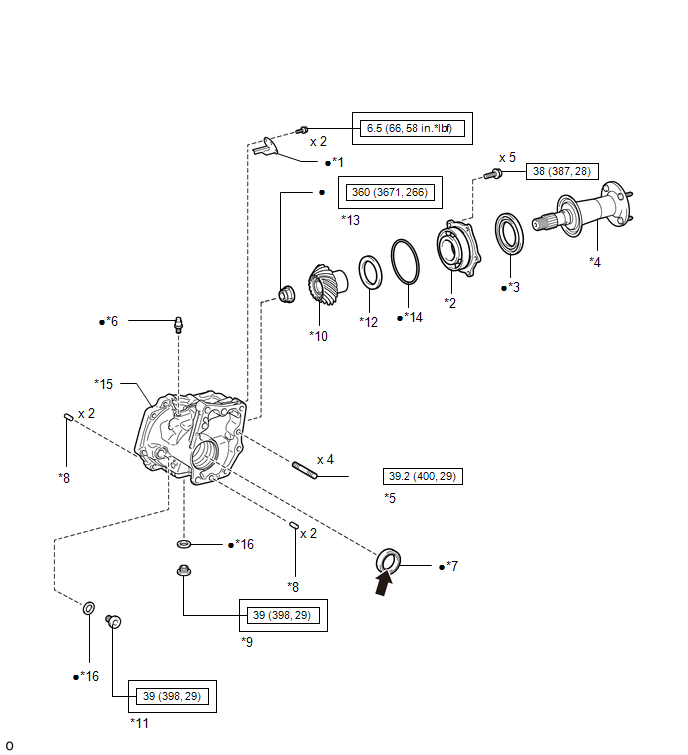
| *1 | BREATHER OIL DEFLECTOR | *2 | FRONT TRANSFER DRIVEN PINION BEARING |
| *3 | REAR TRANSFER OUTPUT SHAFT DUST DEFLECTOR | *4 | REAR TRANSFER OUTPUT SHAFT SUB-ASSEMBLY |
| *5 | TRANSFER AND TRANSAXLE SETTING STUD BOLT | *6 | TRANSFER CASE BREATHER PLUG |
| *7 | TRANSFER CASE OIL SEAL | *8 | TRANSFER CASE STRAIGHT PIN |
| *9 | TRANSFER DRAIN PLUG | *10 | TRANSFER DRIVEN PINION |
| *11 | TRANSFER FILLER PLUG | *12 | TRANSFER OUTPUT SHAFT WASHER |
| *13 | TRANSFER GEAR NUT | *14 | O-RING |
| *15 | TRANSFER CASE | *16 | GASKET |
| | Tightening torque for "Major areas involving basic vehicle performance such as moving/turning/stopping": N*m (kgf*cm, ft.*lbf) | | N*m (kgf*cm, ft.*lbf): Specified torque |
| ● | Non-reusable part | | MP grease |
| ★ | Precoated part | - | - |
READ NEXT:
 Disassembly
DISASSEMBLY CAUTION / NOTICE / HINT NOTICE: Before installation of each part, thoroughly clean and dry it. Then apply grease or oil as necessary. Do not use alkaline chemicals to clean aluminum parts,
Installation
INSTALLATION PROCEDURE 1. INSTALL TRANSFER ASSEMBLY (a) Using SST and a 17 mm union nut wrench, install the transfer assembly to the automatic transaxle assembly with the 8 nuts. SST: 09961-00950 T
Reassembly
REASSEMBLY CAUTION / NOTICE / HINT NOTICE: Steps 9 to 16 are temporary reassembly procedures for adjustment purposes. PROCEDURE 1. INSTALL BREATHER OIL DEFLECTOR (a) Install a new breather oil deflec
SEE MORE:
Installation
INSTALLATION PROCEDURE 1. INSTALL STUD BOLT HINT: If a stud bolt is deformed or the threads are damaged, replace it. (a) Using an E8 "TORX" socket wrench, install the 2 stud bolts to the intake manifold. Torque: 10 N·m {102 kgf·cm, 7 ft·lbf} 2. INSTALL NO. 1 INTAKE MANIFOLD TO HEA
Utility
UTILITY OPERATION HISTORY HINT: History of Reason for Operation: The windshield wiper motor assembly stores Operation History which can be read using the Techstream, when a malfunction of the wiper and washer system occurs. Click here (a) Connect the Techstream to the DLC3. (b) Turn the engine swi
