Lexus ES: Air Cleaner Filter Element
Lexus ES (XZ10) Service Manual / Engine & Hybrid System / 2gr-fks (intake / Exhaust) / Air Cleaner Filter Element
Components
COMPONENTS
ILLUSTRATION
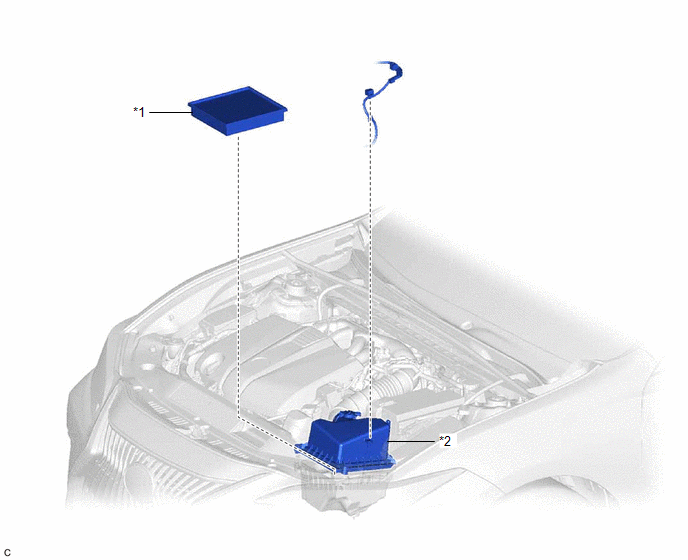
| *1 | AIR CLEANER CAP SUB-ASSEMBLY | *2 | AIR CLEANER FILTER ELEMENT SUB-ASSEMBLY |
Removal
REMOVAL
PROCEDURE
1. SEPARATE AIR CLEANER CAP SUB-ASSEMBLY
Click here .gif)
2. REMOVE AIR CLEANER FILTER ELEMENT SUB-ASSEMBLY
Click here
3. INSPECT AIR CLEANER FILTER ELEMENT SUB-ASSEMBLY
Click here
Installation
INSTALLATION
PROCEDURE
1. INSTALL AIR CLEANER FILTER ELEMENT SUB-ASSEMBLY
Click here .gif)
2. INSTALL AIR CLEANER CAP SUB-ASSEMBLY
Click here
READ NEXT:
 Components
COMPONENTS ILLUSTRATION *A Type A *B Type B *1 FRONT FLOOR COVER RH - - N*m (kgf*cm, ft.*lbf): Specified torque - - ILLUSTRATION *A Type A *B Type B *1
Removal
REMOVAL CAUTION / NOTICE / HINT The necessary procedures (adjustment, calibration, initialization or registration) that must be performed after parts are removed and installed, or replaced during exha
SEE MORE:
Inspection
INSPECTION PROCEDURE 1. INSPECT BRAKE CYLINDER AND PISTON (a) Check the rear disc brake cylinder bore and rear disc brake piston for rust and scoring. If necessary, replace the rear disc brake cylinder and rear disc brake piston. 2. INSPECT PAD LINING THICKNESS (a) Using a ruler, measure the rear
On-vehicle Inspection
ON-VEHICLE INSPECTION PROCEDURE 1. INSPECT CAMSHAFT TIMING OIL CONTROL SOLENOID ASSEMBLY (a) Connect the Techstream to the DLC3. (b) Start the engine. (c) Turn the Techstream on. (d) Inspect the camshaft timing oil control solenoid assembly (for intake side). (1) Enter the following menus: Powertrai
© 2016-2026 Copyright www.lexguide.net
