Lexus ES: Window Defogger Wire
On-vehicle Inspection
ON-VEHICLE INSPECTION
PROCEDURE
1. CHECK REAR WINDOW DEFOGGER OPERATION
(a) When the engine switch (for Gasoline Model) or power switch (for HV Model) is on (IG) and the rear window defogger switch is pressed, check that the window defogger system operates.
2. INSPECT REAR WINDOW DEFOGGER WIRE (BACK WINDOW GLASS)
NOTICE:
- When cleaning the glass, wipe the glass along the wire using a soft dry cloth. Take care not to damage the wire.
- Do not use detergents or glass cleaners that have abrasive ingredients.
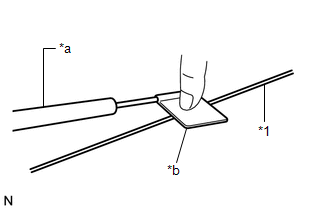
- When measuring voltage, wrap a piece of tin foil around the tip of the negative tester probe and press the foil against the wire with your finger as shown in the illustration.
| (a) Turn the engine switch (for Gasoline Model) or power switch (for HV Model) on (IG). |
|
(b) Turn the rear window defogger switch on.
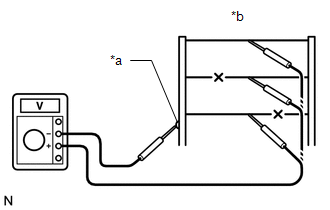
| (c) Measure the voltage at the center of each rear window defogger wire to check the wire as shown in the illustration. Result:
HINT: If the voltage is 11 to 14 V, the wire may be broken between the center of the wire and the wire end on the ground side. If the voltage is below 1 V, the wire may be broken between the center of the wire and the wire end on the battery side. |
|
| (d) Place the positive (+) lead of the voltmeter against the rear window defogger wire on the battery side. |
|

(e) Place the negative (-) lead of the voltmeter with the foil strip against the wire on the ground side.
(f) Slide the positive (+) lead from the battery side to the ground side. The point where the voltage drops to below 1 V from 11 to 14 V is the place where the rear window defogger wire is broken.
HINT:
If the rear window defogger wire is not broken, the voltmeter should indicate 11 to 14 V at the battery side. As the positive (+) lead is moved to the ground side, the voltage gradually decreases to below 1 V.
Repair
REPAIR
PROCEDURE
1. REPAIR REAR WINDOW DEFOGGER WIRE (BACK WINDOW GLASS)
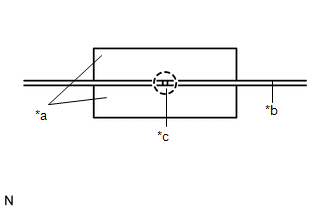
| *a | Masking Tape |
| *b | Broken Wire |
| *c | Repair Point |
(a) Clean the broken wire tips with a grease, wax and silicone remover.
(b) Place masking tape along both sides of the wire.
| (c) Thoroughly mix the repair agent (Dupont paste No. 4817 or equivalent). |
|
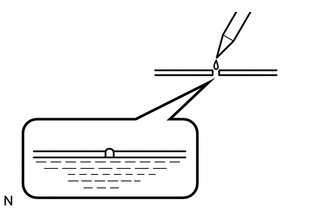
(d) Using a fine tip brush, apply a small amount of the agent to the wire.
(e) After a few minutes, remove the masking tape.
NOTICE:
Do not use the rear window defogger for at least 24 hours after performing the repair.
READ NEXT:
 Precaution
PRECAUTION PRECAUTION FOR DISCONNECTING CABLE FROM NEGATIVE BATTERY TERMINAL NOTICE: When disconnecting the cable from the negative (-) battery terminal, initialize the following systems after the cab
Parts Location
PARTS LOCATION ILLUSTRATION *1 DEICER RELAY *2 NO. 2 ENGINE ROOM RELAY BLOCK AND NO. 2 ENGINE ROOM JUNCTION BLOCK ASSEMBLY - DEICER FUSE *3 MULTI-DISPLAY ASSEMBLY - FRONT WIPER DEICER
SEE MORE:
Installation
INSTALLATION PROCEDURE 1. INSTALL TELEPHONE AND GPS ANTENNA ASSEMBLY (for Moon Roof) (a) When reusing the telephone and GPS antenna assembly: (1) Install a new seal. (b) Push the telephone and GPS antenna assembly in the direction indicated by the arrow (1) shown in the illustration to engage the gu
Back Camera Initialization Incomplete (C1691)
DESCRIPTION This DTC is stored when the rear television camera assembly judges that the back camera initial setting has not been memorized (rear television camera assembly optical axis adjustment (back camera position setting) is incomplete). DTC No. Detection Item DTC Detection Condition T
