Lexus ES: Steering wheel
Adjustment procedure
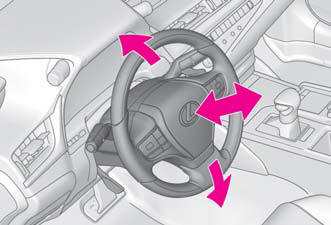
Manual adjustment type
1. Hold the steering wheel and pull the lever down.

2. Adjust to the ideal position by moving the steering wheel horizontally and vertically.
After adjustment, pull the lever up to secure the steering wheel.
Power adjustment type
Operating the switch moves the steering wheel in the following directions:
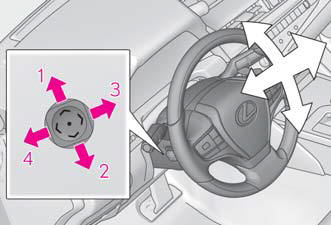
- Up
- Down
- Toward the driver
- Away from the driver
■The power adjustment type steering wheel can be adjusted when The power switch is in ACCESSORY or ON mode.
■Automatic adjustment of the steering position (power adjustment type) A desired steering position can be entered to memory and recalled automatically by the driving position memory system.
■Power easy access system (if equipped) The driver's seat and steering wheel move in accordance with power switch mode and the driver's seat belt condition.
■After adjusting the steering wheel (manual adjustment type) Make sure that the steering wheel is securely locked.
The horn may not sound if the steering wheel is not securely locked.
■Customization The steering wheel movement can be changed.
WARNING
■Caution while driving Do not adjust the steering wheel while driving.
Doing so may cause the driver to mishandle the vehicle and cause an accident, resulting in death or serious injury.
■After adjusting the steering wheel (manual adjustment type) Make sure that the steering wheel is securely locked.
Otherwise, the steering wheel may move suddenly, possibly causing an accident, and resulting in death or serious injury.
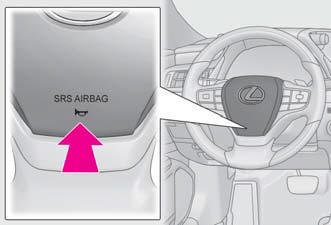
Sounding the horn
Press on or close to the  mark.
mark.
READ NEXT:
 Inside rear view mirror
The rear view mirror's position can
be adjusted to enable sufficient
confirmation of the rear view.
Adjusting the height of rear view
mirror
The height of the rear view mirror can
be adjusted to
Outside rear view mirrors
The rear view mirror's position can
be adjusted to enable sufficient
confirmation of the rear view.
WARNING
■Important points while driving
Observe the following precautions while
driving.
SEE MORE:
Dtc Check / Clear
DTC CHECK / CLEAR CHECK FOR DTC (CHECK USING TECHSTREAM) (a) Connect the Techstream to the DLC3. (b) Turn the power switch on (IG). (c) Turn the Techstream on. (d) Enter the following menus: Body Electrical / Active Noise Control / Trouble Codes. Body Electrical > Active Noise Control > Troubl
Cooling System
On-vehicle InspectionON-VEHICLE INSPECTION CAUTION / NOTICE / HINT CAUTION: Do not remove the radiator cap sub-assembly while the engine and radiator assembly are still hot. Pressurized, hot engine coolant and steam may be released and cause serious burns. PROCEDURE 1. INSPECT FOR COOLANT LEAK (fo
