Lexus ES: Replacement
REPLACEMENT
PROCEDURE
1. REMOVE FRONT WHEEL OPENING EXTENSION PAD RH
Click here .gif)
2. REMOVE FRONT WHEEL OPENING EXTENSION PAD LH
Click here
3. REMOVE NO. 1 ENGINE UNDER COVER
Click here
4. REMOVE NO. 2 ENGINE UNDER COVER ASSEMBLY
Click here
5. DRAIN TRANSFER OIL
(a) Stop the vehicle on a level surface.
|
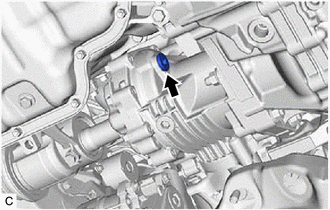
(b) Using a 10 mm straight hexagon wrench and 10 x 12 mm long offset wrench, remove the transfer filler plug and gasket from the transfer assembly. |
|
|
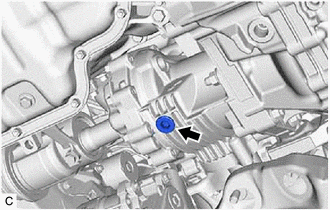
(c) Using a 10 mm hexagon socket wrench, remove the transfer drain plug and gasket from the transfer assembly and drain the transfer oil. |
|
(d) Using a 10 mm straight hexagon wrench and 10 x 12 mm long offset wrench, temporarily install the transfer filler plug and gasket to the transfer assembly.
HINT:
Reuse the old gasket as the transfer filler plug will be removed again.
(e) Using a 10 mm hexagon socket wrench, install the transfer drain plug and a new gasket to the transfer assembly.
Torque:
39 N·m {398 kgf·cm, 29 ft·lbf}
6. ADD TRANSFER OIL
(a) Using a 10 mm straight hexagon wrench and 10 x 12 mm long offset wrench, remove the transfer filler plug and gasket from the transfer assembly.
(b) Add transfer oil.
Oil Type and Viscosity:
Toyota genuine differential gear oil LT SAE 75W-85 API GL-5 or equivalent
Standard Capacity:
0.45 liters (0.47 US qts, 0.39 Imp. qts)
NOTICE:
Using transfer oil other than the specified oil may cause abnormal noise or vibration, or damage the transfer of the vehicle.
|
(c) Pour transfer oil so that the oil level is between 0 to 5 mm (0 to 0.197 in.) from the bottom lip of the transfer filler plug hole. NOTICE:
|
|

(d) Wait approximately 5 minutes and check that the oil level has not changed.
|
(e) Using SST, a 10 mm straight hexagon wrench and 10 mm union nut wrench, install the transfer filler plug and a new gasket to the transfer assembly. SST: 09961-00950 Torque: Specified tightening torque : 39 N·m {398 kgf·cm, 29 ft·lbf} NOTICE: After adding transfer oil, drive the vehicle and recheck the oil level. HINT:
|
|

7. INSPECT FOR TRANSFER OIL LEAK
8. INSTALL NO. 2 ENGINE UNDER COVER ASSEMBLY
Click here
9. INSTALL NO. 1 ENGINE UNDER COVER
Click here
10. INSTALL FRONT WHEEL OPENING EXTENSION PAD LH
Click here
11. INSTALL FRONT WHEEL OPENING EXTENSION PAD RH
Click here
READ NEXT:
 Components
COMPONENTS
ILLUSTRATION
*1
FRONT WHEEL OPENING EXTENSION PAD RH
*2
FRONT WHEEL OPENING EXTENSION PAD LH
*3
NO. 1 ENGINE UNDE
Replacement
REPLACEMENT
PROCEDURE
1. REMOVE FRONT WHEEL OPENING EXTENSION PAD RH
Click here
2. REMOVE FRONT WHEEL OPENING EXTENSION PAD LH
Click here
3. REMOVE NO. 1 ENGINE UNDER COVER
Click here
SEE MORE:
Camshaft Position Sensor "A" Bank 1 or Single Sensor No Signal (P034031)
DESCRIPTION Refer to DTC P034011. Click here DTC No. Detection Item DTC Detection Condition Trouble Area MIL Memory Note P034031 Camshaft Position Sensor "A" Bank 1 or Single Sensor No Signal No camshaft position sensor (for intake camshaft) signal for 5 seconds at an engine
On-vehicle Inspection
ON-VEHICLE INSPECTION PROCEDURE 1. REMOVE FRONT WHEEL OPENING EXTENSION PAD RH Click here 2. REMOVE FRONT WHEEL OPENING EXTENSION PAD LH Click here 3. REMOVE NO. 1 ENGINE UNDER COVER Click here 4. REMOVE NO. 2 ENGINE UNDER COVER ASSEMBLY Click here 5. INSPECT HYBRID TRANSAXLE FLUID
