Lexus ES: Removal
REMOVAL
CAUTION / NOTICE / HINT
The necessary procedures (adjustment, calibration, initialization, or registration) that must be performed after parts are removed and installed, or replaced during outer rear view mirror assembly with cover removal/installation are shown below.
Necessary Procedure After Parts Removed/Installed/Replaced (for Gasoline Model)| Replaced Part or Performed Procedure | Necessary Procedure | Effect/Inoperative Function when Necessary Procedure not Performed | Link |
|---|---|---|---|
| Side television camera view adjustment | Panoramic view monitor system | |
| Replaced Part or Performed Procedure | Necessary Procedure | Effect/Inoperative Function when Necessary Procedure not Performed | Link |
|---|---|---|---|
| Side television camera view adjustment | Panoramic view monitor system | |
HINT:
- Use the same procedure for the RH side and LH side.
- The following procedure is for the LH side.
PROCEDURE
1. REMOVE OUTER MIRROR
Click here .gif)
.gif)
2. REMOVE OUTER MIRROR COVER ASSEMBLY
(a) w/o Panoramic View Monitor System:

(1) Remove the 4 screws.
(2) Pull the outer mirror cover assembly as shown in the illustration to disengage the 2 claws.
NOTICE:
As the claws may be damaged, make sure not to apply force in any direction other than shown in the illustration.
HINT:
If it is difficult to disengage the claws, disengage them using a screwdriver with its tip wrapped with protective tape.
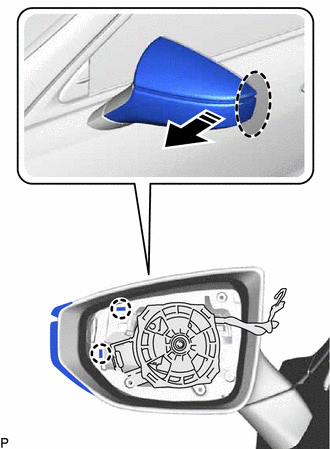
.png) | Place Hand Here |
.png) | Pull in this Direction |
(3) Pull the outer mirror cover assembly as shown in the illustration to disengage the 2 claws.
NOTICE:
As the claws may be damaged, make sure not to apply force in any direction other than shown in the illustration.
HINT:
If it is difficult to disengage the claws, disengage them using a screwdriver with its tip wrapped with protective tape.
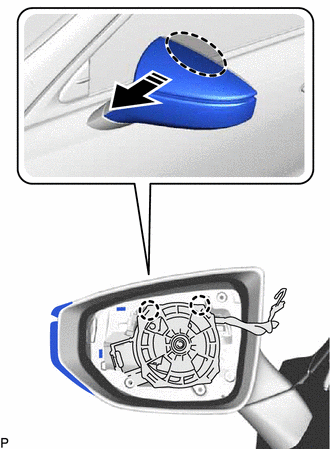
.png) | Place Hand Here |
.png) | Pull in this Direction |
(4) Pull the outer mirror cover assembly as shown in the illustration to disengage the claw and remove the outer mirror cover assembly.
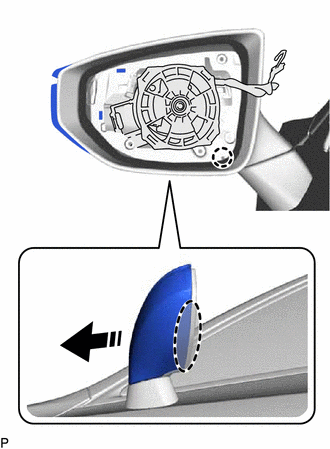
.png) | Place Hand Here |
.png) | Remove in this Direction |
NOTICE:
As the claws may be damaged, make sure not to apply force in any direction other than shown in the illustration.
HINT:
If it is difficult to disengage the claws, disengage them using a screwdriver with its tip wrapped with protective tape.
| (5) Disconnect the connector to remove the outer mirror cover assembly. |
|
(b) w/ Panoramic View Monitor System:

(1) Remove the 4 screws.
(2) Pull the outer mirror cover assembly as shown in the illustration to disengage the 2 claws.
NOTICE:
As the claws may be damaged, make sure not to apply force in any direction other than shown in the illustration.
HINT:
If it is difficult to disengage the claws, disengage them using a screwdriver with its tip wrapped with protective tape.

.png) | Place Hand Here |
.png) | Pull in this Direction |
(3) Pull the outer mirror cover assembly as shown in the illustration to disengage the 2 claws.
NOTICE:
As the claws may be damaged, make sure not to apply force in any direction other than shown in the illustration.
HINT:
If it is difficult to disengage the claws, disengage them using a screwdriver with its tip wrapped with protective tape.

.png) | Place Hand Here |
.png) | Pull in this Direction |
(4) Pull the outer mirror cover assembly as shown in the illustration to disengage the claw and remove the outer mirror cover assembly.
NOTICE:
As the claws may be damaged, make sure not to apply force in any direction other than shown in the illustration.
HINT:
If it is difficult to disengage the claws, disengage them using a screwdriver with its tip wrapped with protective tape.

.png) | Place Hand Here |
.png) | Pull in this Direction |
| (5) Disconnect the connector. |
|
(6) Disengage the clamp as shown in the illustration.
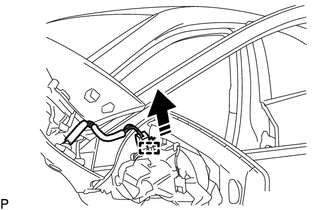
.png) | Remove in this Direction |
(7) Remove the outer mirror tape as shown in the illustration.
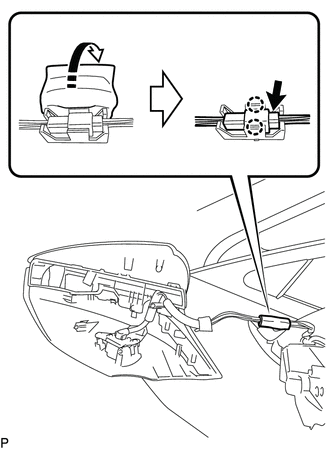
.png) | Remove in this Direction |
(8) Disengage the 2 claws to remove the camera connector clamp.
| (9) Insert a 0.9 mm (0.0354 in.) spark plug gap gauge or similar tool into the connector as shown in the illustration. NOTICE:
|
|
(10) Lift the claw and disconnect the connector.
3. REMOVE SIDE TELEVISION CAMERA ASSEMBLY (w/ Panoramic View Monitor System)
Click here .gif)
4. REMOVE OUTER MIRROR LOWER COVER
| (a) Remove the screw and outer mirror lower cover. |
|
5. REMOVE OUTER MIRROR UPPER COVER
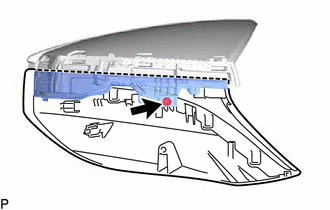
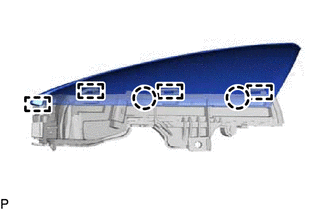
| (a) Disengage the 2 claws and 4 guides to remove the outer mirror upper cover from the side turn signal light assembly. |
|
6. REMOVE VISOR COVER ASSEMBLY
(a) Remove the visor cover assembly from the outer mirror actuator assembly.


