Lexus ES: Removal
REMOVAL
PROCEDURE
1. REMOVE FRONT WHEEL OPENING EXTENSION PAD RH
Click here .gif)
2. REMOVE FRONT WHEEL OPENING EXTENSION PAD LH
Click here
3. REMOVE NO. 1 ENGINE UNDER COVER
Click here
4. REMOVE NO. 2 ENGINE UNDER COVER ASSEMBLY
Click here
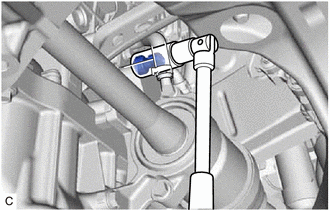
5. REMOVE OIL PRESSURE AND TEMPERATURE SENSOR
(a) Disconnect the oil pressure and temperature sensor connector.
| (b) Using a 24 mm deep socket wrench, remove the oil pressure and temperature sensor. NOTICE: If the oil pressure and temperature sensor is dropped or subjected to a strong impact, replace it with a new one. |
|
READ NEXT:
 Inspection
INSPECTION PROCEDURE 1. INSPECT OIL PRESSURE AND TEMPERATURE SENSOR (a) Check the oil pressure and temperature sensor output voltage. (1) Apply 5 V between terminals 3 (VC) and 2 (GND). NOTICE:
Installation
INSTALLATION PROCEDURE 1. INSTALL OIL PRESSURE AND TEMPERATURE SENSOR (a) Apply adhesive to the area shown in the illustration. Adhesive: Toyota Genuine Adhesive 1344, Three Bond 1344 or equivalent
SEE MORE:
Components
COMPONENTS ILLUSTRATION *A for LH Side - - *1 COWL SIDE TRIM BOARD LH *2 FRONT DOOR OPENING TRIM COVER LH *3 FRONT DOOR SCUFF PLATE LH *4 INSTRUMENT SIDE PANEL LH *5 LOWER INSTRUMENT PANEL FINISH PANEL SUB-ASSEMBLY *6 NO. 1 INSTRUMENT PANEL UNDER COVER SUB-ASS
System Description
SYSTEM DESCRIPTION DESCRIPTION (a) The power steering ECU (rack and pinion power steering gear assembly) generates the necessary steering assist torque by calculating the steering assist force and controlling the motor current, based on the steering torque information from the torque sensor (rack an
© 2016-2026 Copyright www.lexguide.net
