
Lexus ES: Removal
REMOVAL
CAUTION / NOTICE / HINT
The necessary procedures (adjustment, calibration, initialization, or registration) that must be performed after parts are removed and installed, or replaced during knock control sensor removal/installation are shown below.
Necessary Procedures After Parts Removed/Installed/Replaced| Replaced Part or Performed Procedure | Necessary Procedure | Effect/Inoperative Function when Necessary Procedure not Performed | Link |
|---|---|---|---|
| Inspection after repair |
| |
NOTICE:
This procedure includes the removal of small-head bolts. Refer to Small-Head Bolts of Basic Repair Hint to identify the small-head bolts.
Click here .gif)
PROCEDURE
1. REMOVE INTAKE MANIFOLD
Click here
2. REMOVE KNOCK CONTROL SENSOR
| (a) Disconnect the knock control sensor connector. |
|
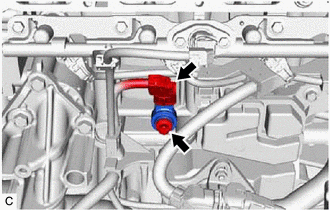
(b) Remove the bolt and knock control sensor from the cylinder block sub-assembly.
NOTICE:
If the knock control sensor has been struck or dropped, replace it.
READ NEXT:
 Inspection
INSPECTION PROCEDURE 1. INSPECT KNOCK CONTROL SENSOR (a) Measure the resistance according to the value(s) in the table below. Standard Resistance: Tester Connection Condition Specified Cond
Installation
INSTALLATION CAUTION / NOTICE / HINT NOTICE: This procedure includes the installation of small-head bolts. Refer to Small-Head Bolts of Basic Repair Hint to identify the small-head bolts. Click here
SEE MORE:
Disassembly
DISASSEMBLY PROCEDURE 1. REMOVE CLUTCH DRUM OIL SEAL RING (a) Remove the 4 clutch drum oil seal rings from the stator shaft assembly. 2. REMOVE OIL STRAINER ASSEMBLY (a) Using a T30 "TORX" socket wrench, remove the 2 bolts and oil strainer assembly from the front oil pump cover sub
System Diagram
SYSTEM DIAGRAM Communication Table Sender Receiver Signal Line Certification ECU (Smart Key ECU Assembly) Main Body ECU (Multiplex Network Body ECU) Luggage compartment door lock assembly open operation signal CAN
