Lexus ES: Removal
REMOVAL
CAUTION / NOTICE / HINT
NOTICE:
This procedure includes the removal of small-head bolts. Refer to Small-Head Bolts of Basic Repair Hint to identify the small-head bolts.
Click here .gif)
PROCEDURE
1. REMOVE FRONT WHEEL OPENING EXTENSION PAD RH
Click here
2. REMOVE FRONT WHEEL OPENING EXTENSION PAD LH
Click here
3. REMOVE NO. 1 ENGINE UNDER COVER
Click here
4. REMOVE NO. 2 ENGINE UNDER COVER ASSEMBLY
Click here
5. DRAIN ENGINE OIL
Click here
6. REMOVE NO. 2 OIL PAN SUB-ASSEMBLY
Click here
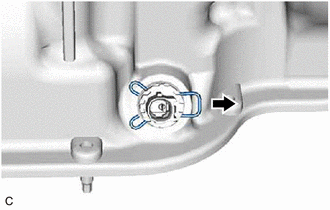
7. REMOVE ENGINE OIL LEVEL SENSOR
(a) Disconnect the engine oil level sensor connector.
| (b) Remove the clip from the engine oil level sensor. |
|
| (c) Using an 8 mm socket wrench, remove the 2 bolts and engine oil level sensor from the engine balancer assembly. |
|

READ NEXT:
 Inspection
INSPECTION PROCEDURE 1. INSPECT ENGINE OIL LEVEL SENSOR (a) Measure the resistance according to the value(s) in the table below. Standard Resistance: Tester Connection Condition Specified C
Installation
INSTALLATION CAUTION / NOTICE / HINT NOTICE: This procedure includes the installation of small-head bolts. Refer to Small-Head Bolts of Basic Repair Hint to identify the small-head bolts. Click here
SEE MORE:
Panel Switches do not Function
CAUTION / NOTICE / HINT NOTICE:
Depending on the parts that are replaced during vehicle inspection or maintenance, performing initialization, registration or calibration may be needed. Refer to Precaution for Audio and Visual System.
Click here
When replacing the radio receiver assembly, alw
Components
COMPONENTS ILLUSTRATION *A for A25A-FXS *B for 2GR-FKS *1 FRONT WHEEL OPENING EXTENSION PAD LH *2 FRONT WHEEL OPENING EXTENSION PAD RH *3 NO. 1 ENGINE UNDER COVER *4 NO. 2 ENGINE UNDER COVER *5 NO. 2 ENGINE UNDER COVER ASSEMBLY *6 NO. 3 ENGINE UNDER COVER
