Lexus ES: Removal
REMOVAL
PROCEDURE
1. REMOVE COOL AIR INTAKE DUCT SEAL
Click here .gif)
2. REMOVE NO. 1 ENGINE COVER SUB-ASSEMBLY
Click here
3. REMOVE INLET AIR CLEANER ASSEMBLY
Click here
4. REMOVE AIR CLEANER ASSEMBLY WITH AIR CLEANER HOSE
Click here
5. REMOVE VACUUM SWITCHING VALVE (for Active Control Engine Mount System)
| (a) Remove the bolt and disengage the 2 wire harness clamps to separate the engine wire. |
|
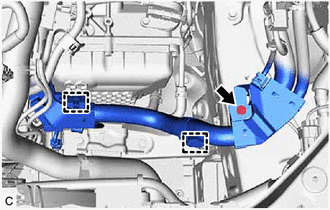
| (b) Remove the bolt and wire harness clamp bracket from the transmission case side cover. |
|
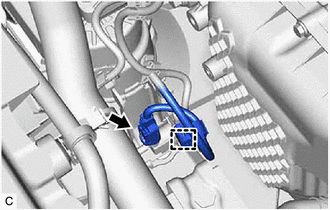
| (c) Disengage the wire harness clamp and disconnect the vacuum switching valve (for active control engine mount system) connector. |
|
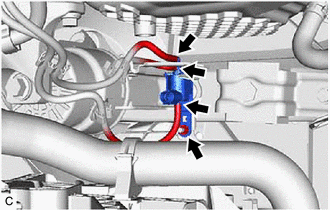
| (d) Disconnect the 3 vacuum hoses from the vacuum switching valve (for active control engine mount system). |
|
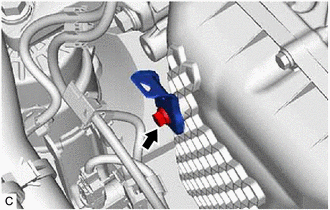
(e) Remove the nut and vacuum switching valve (for active control engine mount system) from the front engine mounting insulator.
READ NEXT:
 Inspection
INSPECTION PROCEDURE 1. INSPECT VACUUM SWITCHING VALVE (for Active Control Engine Mount System) (a) Measure the resistance. (1) Measure the resistance according to the value(s) in the table below.
Installation
INSTALLATION PROCEDURE 1. INSTALL VACUUM SWITCHING VALVE (for Active Control Engine Mount System) (a) Install the vacuum switching valve (for active control engine mount system) to the front engine mo
SEE MORE:
Hybrid/EV Battery Current Sensor "A" Circuit Short to Ground (P0ABF11,P0ABF15,P0B0E11,P0B0E15,P1CBB12,P1CBB14)
DESCRIPTION A battery current sensor, which is mounted on the positive cable side of each HV battery junction block assembly, detects the current flowing to or from the battery pack. The battery current sensor sends a voltage, which varies between 0 and 5 V in proportion to the amperage, to the IB0
Driving Mode Select switch
The driving modes can be selected
to suit driving condition.
Selecting the driving mode
Normal mode
Provides an optimal balance of fuel economy,
quietness, and dynamic performance.
Suitable for city driving.
Press the switch to change the normal
mode when not in normal mode.
