Lexus ES: Relay
Inspection
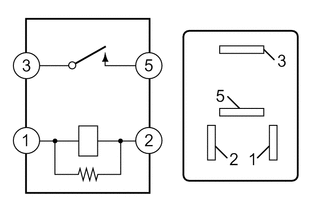
INSPECTION
PROCEDURE
1. INSPECT ST RELAY
| (a) Check the resistance. (1) Measure the resistance according to the value(s) in the table below. Standard Resistance:
If the result is not as specified, replace the ST relay. |
|
READ NEXT:
 Components
COMPONENTS ILLUSTRATION *1 AIR CLEANER ASSEMBLY WITH AIR CLEANER HOSE *2 INLET AIR CLEANER ASSEMBLY *3 BATTERY CLAMP SUB-ASSEMBLY *4 COOL AIR INTAKE DUCT SEAL *5 ECM *6 S
Removal
REMOVAL CAUTION / NOTICE / HINT The necessary procedures (adjustment, calibration, initialization or registration) that must be performed after parts are removed and installed, or replaced during star
SEE MORE:
Customize Parameters
CUSTOMIZE PARAMETERS CUSTOMIZE ROAD SIGN ASSIST SYSTEM NOTICE: Be sure to make a note of the current settings before customizing. (a) Customizing with the multi-information display (1) Turn the engine switch on (IG). (2) Using the steering pad switches, change the customize settings. HINT: Each item
Disassembly
DISASSEMBLY PROCEDURE 1. REMOVE FRONT BUMPER EXTENSION MOUNTING BRACKET (for Bar Type Radiator Grille) (a) Remove the 2 screws. (b) Disengage the 4 claws to remove the front bumper extension mounting bracket as shown in the illustration. Remove in this Direction 2. REMOVE FR
© 2016-2026 Copyright www.lexguide.net
