Lexus ES: Rear Power Window Switch
Components
COMPONENTS
ILLUSTRATION
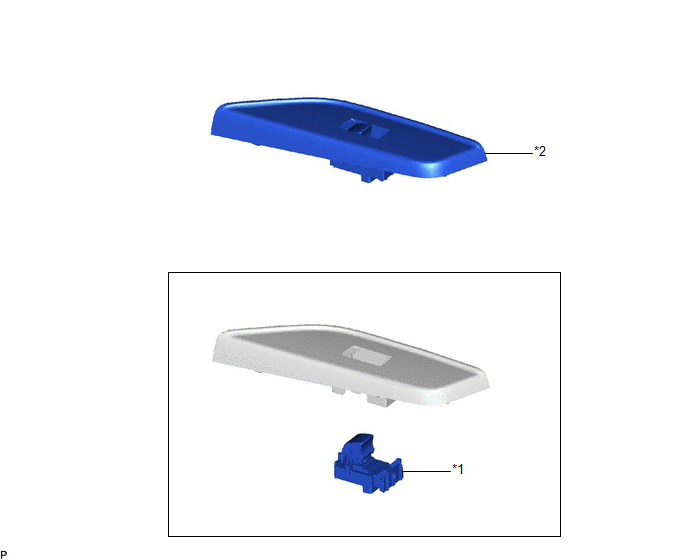
| *1 | REAR POWER WINDOW REGULATOR SWITCH ASSEMBLY | *2 | REAR POWER WINDOW REGULATOR SWITCH ASSEMBLY WITH REAR DOOR UPPER ARMREST BASE PANEL |
Removal
REMOVAL
CAUTION / NOTICE / HINT
HINT:
- Use the same procedure for the RH side and LH side.
- The following procedure is for the LH side.
PROCEDURE
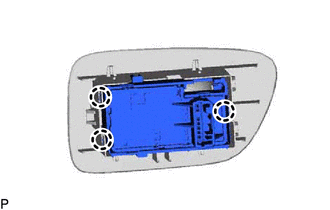
1. REMOVE REAR POWER WINDOW REGULATOR SWITCH ASSEMBLY WITH REAR DOOR UPPER ARMREST BASE PANEL
Click here .gif)
2. REMOVE REAR POWER WINDOW REGULATOR SWITCH ASSEMBLY
| (a) Disengage the 3 claws to remove the rear power window regulator switch assembly. |
|
Inspection
INSPECTION
PROCEDURE
1. INSPECT REAR POWER WINDOW REGULATOR SWITCH ASSEMBLY (for LH/RH DOOR)
| (a) Check the switch function. (1) Measure the resistance according to the value(s) in the table below. Standard Resistance:
If the result is not as specified, replace the rear power window regulator switch assembly (for LH/RH door). |
|
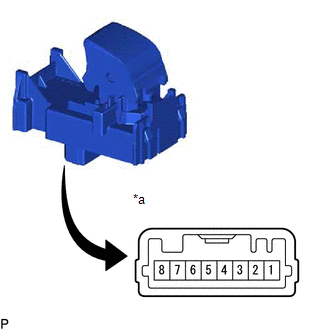
(b) Check that the LED illuminates.
(1) Apply auxiliary battery voltage to the power window regulator switch assembly and check that the LED illuminates.
OK:
| Battery Connection | Specified Condition |
|---|---|
| Auxiliary battery positive (+) → 2 Auxiliary battery negative (-) → 7 | LED illuminates |
If the result is not as specified, replace the rear power window regulator switch assembly (for LH/RH door).
Installation
INSTALLATION
CAUTION / NOTICE / HINT
HINT:
- Use the same procedure for the RH side and LH side.
- The following procedure is for the LH side.
PROCEDURE
1. INSTALL REAR POWER WINDOW REGULATOR SWITCH ASSEMBLY
(a) Engage the 3 claws to install the rear power window regulator switch assembly.
2. INSTALL REAR POWER WINDOW REGULATOR SWITCH ASSEMBLY WITH REAR DOOR UPPER ARMREST BASE PANEL
Click here .gif)
READ NEXT:
 Relay
Relay
On-vehicle InspectionON-VEHICLE INSPECTION PROCEDURE 1. INSPECT DEF RELAY (a) Measure the resistance according to the value(s) in the table below. Standard Resistance: Tester Connection Cond
Precaution
PRECAUTION PRECAUTION FOR DISCONNECTING CABLE FROM NEGATIVE BATTERY TERMINAL NOTICE: When disconnecting the cable from the negative (-) battery terminal, initialize the following systems after the cab
SEE MORE:
Dtc Check / Clear
DTC CHECK / CLEAR CHECK DTC (a) Turn the engine switch off. (b) Connect the Techstream to the DLC3. (c) Turn the engine switch on (IG). (d) Turn the Techstream on. (e) Enter the following menus: Body Electrical / Tilt & Telescopic / Trouble Codes. Body Electrical > Tilt&Telescopic > Tr
Precaution
PRECAUTION CAUTION:
Never perform work on fuel system components near any possible ignition sources.
Vaporized fuel could ignite, resulting in a serious accident.
Do not perform work on fuel system components without first disconnecting the cable from the negative (-) battery terminal.
Sp
