Lexus ES: Quarter Garnish
Components
COMPONENTS
ILLUSTRATION
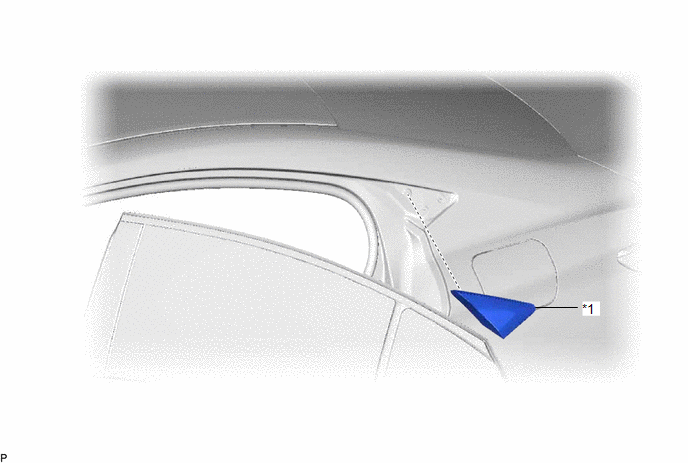
| *1 | REAR ROOF DRIP SIDE FINISH MOULDING | - | - |
Removal
REMOVAL
CAUTION / NOTICE / HINT
HINT:
- Use the same procedure for the RH side and LH side.
- The following procedure is for the LH side.
PROCEDURE
1. REMOVE REAR ROOF DRIP SIDE FINISH MOULDING
(a) Apply protective tape around the rear roof drip side finish moulding as shown in the illustration.
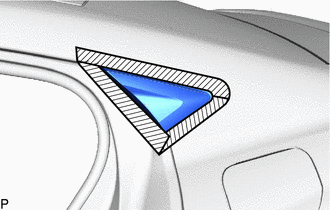
.png) | Protective Tape |
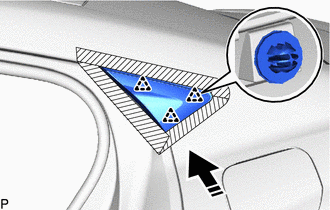
(b) Disengage the 3 clips to remove the rear roof drip side finish moulding as shown in the illustration.

.png) | Remove in this Direction |
Installation
INSTALLATION
CAUTION / NOTICE / HINT
HINT:
- Use the same procedure for the RH side and LH side.
- The following procedure is for the LH side.
PROCEDURE
1. INSTALL REAR ROOF DRIP SIDE FINISH MOULDING
(a) Engage the 3 clips to install the rear roof drip side finish moulding as shown in the illustration.
.png) | Install in this Direction |
READ NEXT:
 Components
COMPONENTS ILLUSTRATION *1 REAR BUMPER ASSEMBLY *2 REAR COMBINATION LIGHT COVER LH *3 REAR COMBINATION LIGHT COVER RH - - ILLUSTRATION *A w/ Hands Free Power Trunk Lid -
Removal
REMOVAL CAUTION / NOTICE / HINT The necessary procedures (adjustment, calibration, initialization, or registration) that must be performed after parts are removed and installed, or replaced during rea
SEE MORE:
Diagnosis System
DIAGNOSIS SYSTEM PARKING ASSIST MONITOR SYSTEM DIAGNOSTIC MODE (a) In diagnostic mode for the parking assist monitor system, signals received by the radio receiver assembly can be checked and the parking assist monitor system can be calibrated, adjusted and checked using the multi-display assembly.
Removal
REMOVAL CAUTION / NOTICE / HINT The necessary procedures (adjustment, calibration, initialization or registration) that must be performed after parts are removed and installed, or replaced during engine water pump assembly removal/installation are shown below. Necessary Procedure After Parts Removed
© 2016-2026 Copyright www.lexguide.net
