
Lexus ES: Parts Location
Lexus ES (XZ10) Service Manual / Engine & Hybrid System / A25a-fxs (emission Control) / Emission Control System / Parts Location
PARTS LOCATION
ILLUSTRATION
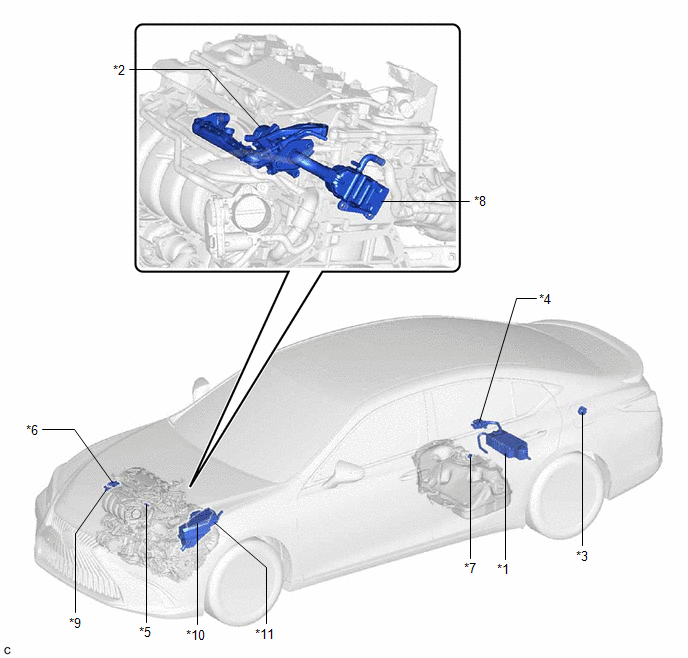
| *1 | CANISTER (CHARCOAL CANISTER ASSEMBLY) | *2 | EGR VALVE ASSEMBLY |
| *3 | FUEL TANK CAP ASSEMBLY | *4 | FUEL VAPOR CONTAINMENT VALVE (FUEL TANK SOLENOID MAIN VALVE ASSEMBLY) |
| *5 | PCV VALVE (VENTILATION VALVE SUB-ASSEMBLY) | *6 | PURGE VALVE (PURGE VSV) |
| *7 | FUEL TANK PRESSURE SENSOR (VAPOR PRESSURE SENSOR ASSEMBLY) | *8 | EGR COOLER ASSEMBLY |
| *9 | E.F.I. VACUUM SENSOR ASSEMBLY (MANIFOLD ABSOLUTE PRESSURE SENSOR) | *10 | ECM |
| *11 | NO. 1 ENGINE ROOM RELAY BLOCK AND JUNCTION BLOCK ASSEMBLY - EFI-MAIN NO. 1 RELAY - EFI-MAIN NO. 1 FUSE - EFI NO. 1 FUSE | - | - |
READ NEXT:
 System Diagram
SYSTEM DIAGRAM *1 Intake Manifold *2 Purge Valve (Purge VSV) *3 Throttle Valve *4 Canister (Charcoal Canister Assembly) *5 Air Cleaner *6 ECM *7 Canister Filter *
On-vehicle Inspection
ON-VEHICLE INSPECTION CAUTION / NOTICE / HINT CAUTION: To prevent injury due to contact with an operating cooling fan, keep your hands and clothing away from the cooling fans when working in the engin
Fuel Tank Cap
InspectionINSPECTION PROCEDURE 1. INSPECT FUEL TANK CAP ASSEMBLY (a) Visually check that the fuel tank cap assembly and gasket are not deformed or damaged. If the result is not as specified, repla
SEE MORE:
Lubrication System
On-vehicle InspectionON-VEHICLE INSPECTION PROCEDURE 1. CHECK ENGINE OIL LEVEL (a) Warm up and stop the engine, then wait for 5 minutes. (b) Check that the engine oil level is between the low level and full level marks on the engine oil level dipstick. If the level is low, check for engine oil leak
Installation
INSTALLATION CAUTION / NOTICE / HINT HINT:
Use the same procedure for the RH side and LH side.
The following procedure is for the LH side.
PROCEDURE 1. INSTALL HEADLIGHT ASSEMBLY Click here 2. INSTALL FRONT FENDER SPLASH SHIELD SUB-ASSEMBLY Click here 3. INSTALL COWL TOP PANEL INSULATOR
© 2016-2026 Copyright www.lexguide.net
