Lexus ES: Parts Location
PARTS LOCATION
ILLUSTRATION
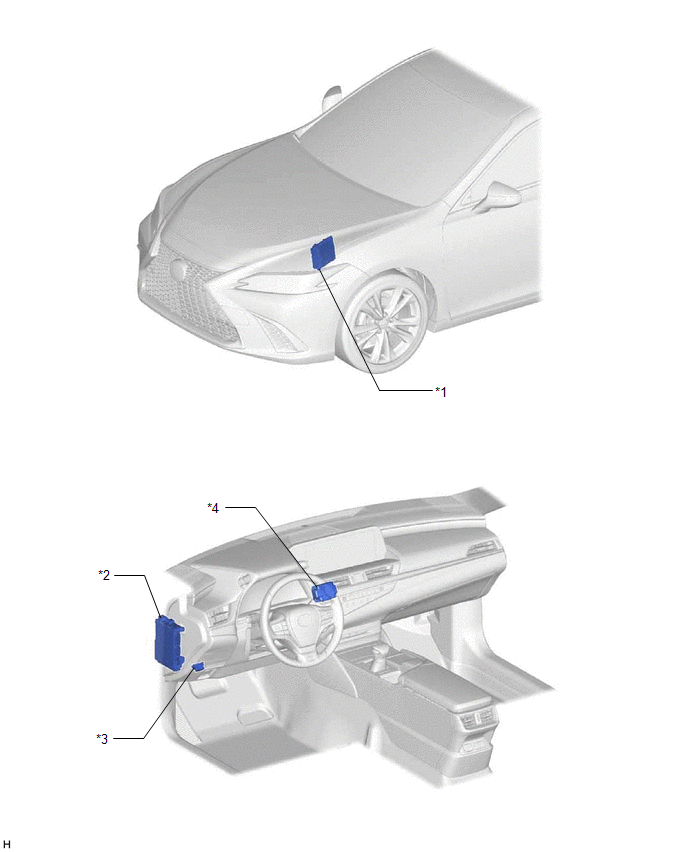
| *1 | ECM | *2 | INSTRUMENT PANEL JUNCTION BLOCK ASSEMBLY - ECU-B NO. 2 FUSE - ECU-IG1 NO. 4 FUSE - ECU-ACC FUSE |
| *3 | DLC3 | *4 | STEREO COMPONENT EQUALIZER ASSEMBLY |
ILLUSTRATION
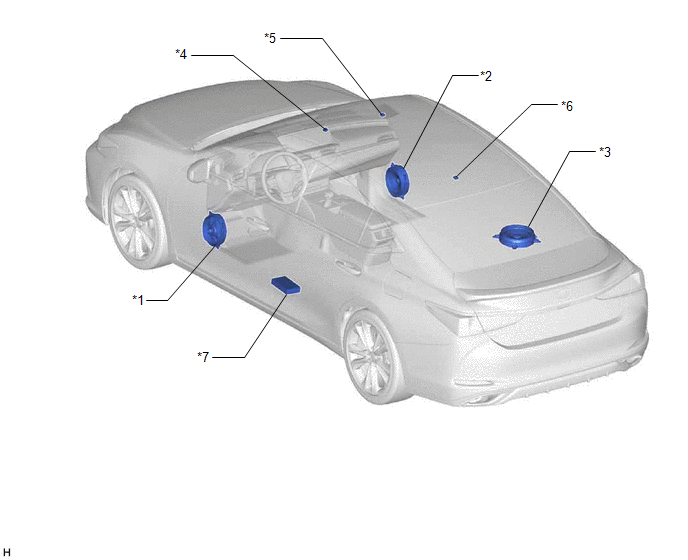
| *1 | FRONT NO. 1 SPEAKER ASSEMBLY LH | *2 | FRONT NO. 1 SPEAKER ASSEMBLY RH |
| *3 | SPEAKER ASSEMBLY WITH BRACKET | *4 | NO. 1 ACTIVE NOISE CONTROL MICROPHONE |
| *5 | NO. 2 ACTIVE NOISE CONTROL MICROPHONE | *6 | NO. 3 ACTIVE NOISE CONTROL MICROPHONE |
| *7 | STEREO COMPONENT AMPLIFIER ASSEMBLY | - | - |
READ NEXT:
 Power Source Circuit
DESCRIPTION This circuit is the power source circuit for the stereo component equalizer assembly. WIRING DIAGRAM CAUTION / NOTICE / HINT NOTICE: Inspect the fuses and relays for circuits related to t
Precaution
PRECAUTION PRECAUTION FOR ACTIVE NOISE CONTROL SYSTEM (a) If the active noise control microphone garnish hole is blocked, clean away the blockage and perform diagnosis. (b) If heavy objects are loaded
Problem Symptoms Table
PROBLEM SYMPTOMS TABLE NOTICE:
Before checking parts for malfunctions, check that the audio system operates normally.
Use the table below to help determine the cause of problem symptoms. If multi
SEE MORE:
Inspection
INSPECTION PROCEDURE 1. INSPECT AIR FUEL RATIO SENSOR (a) Measure the resistance according to the value(s) in the table below. Standard Resistance: Tester Connection Condition Specified Condition 1 (HA1B) - 2 (+B) 20°C (68°F) 2 to 6 Ω 1 (HA1B) - 4 (A1B-) Always 10 kΩ o
Precaution
PRECAUTION PRECAUTION FOR DISCONNECTING CABLE FROM NEGATIVE BATTERY TERMINAL NOTICE: When disconnecting the cable from the negative (-) battery terminal, initialize the following systems after the cable is reconnected. System Name See Procedure Lane Control System (for Gasoline Model)
© 2016-2026 Copyright www.lexguide.net
