Lexus ES: License Plate Light Assembly
Components
COMPONENTS
ILLUSTRATION
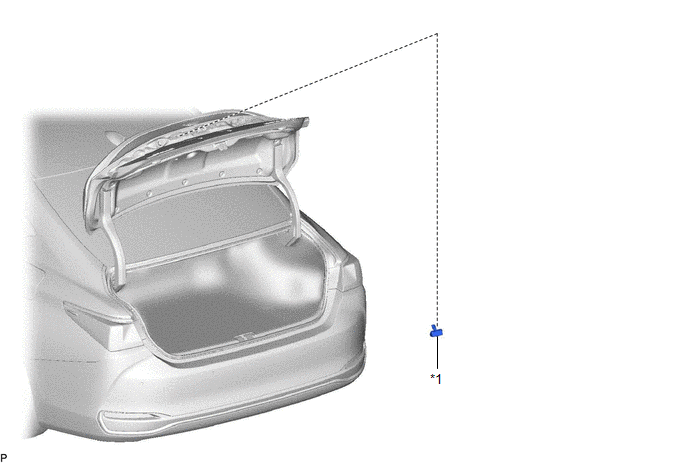
| *1 | LICENSE PLATE LIGHT ASSEMBLY | - | - |
Removal
REMOVAL
CAUTION / NOTICE / HINT
HINT:
- Use the same procedure for the RH side and LH side.
- The following procedure is for the LH side.
PROCEDURE
1. REMOVE LUGGAGE COMPARTMENT DOOR OUTSIDE GARNISH SUB-ASSEMBLY
Click here .gif)
2. REMOVE LICENSE PLATE LIGHT ASSEMBLY
| (a) Disconnect the connector. |
|
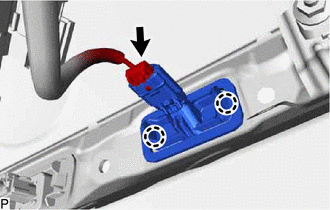
(b) Disengage the 2 claws to remove the license plate light assembly.
Inspection
INSPECTION
PROCEDURE
1. INSPECT LICENSE PLATE LIGHT ASSEMBLY LH

| *a | Component without harness connected (License Plate Light Assembly LH) |
(a) Connect 4 dry-cell batteries (1.5 V) in series.
NOTICE:
Do not use rechargeable batteries as they may not output a voltage of 1.5 V.
(b) Apply 6.0 V battery voltage to the license plate light assembly LH and check that the light illuminates.
OK:
| Measurement Condition | Specified Condition |
|---|---|
| Positive (+) lead from the batteries → Terminal 1 (B) Negative (-) lead from the batteries → Terminal 2 (E) | License plate light illuminates |
If the result is not as specified, replace the license plate light assembly LH.
2. INSPECT LICENSE PLATE LIGHT ASSEMBLY RH
| *a | Component without harness connected (License Plate Light Assembly RH) |
(a) Connect 4 dry-cell batteries (1.5 V) in series.
NOTICE:
Do not use rechargeable batteries as they may not output a voltage of 1.5 V.
(b) Apply 6.0 V battery voltage to the license plate light assembly RH and check that the light illuminates.
OK:
| Measurement Condition | Specified Condition |
|---|---|
| Positive (+) lead from the batteries → Terminal 1 (B) Negative (-) lead from the batteries → Terminal 2 (E) | License plate light illuminates |
If the result is not as specified, replace the license plate light assembly RH.
Installation
INSTALLATION
CAUTION / NOTICE / HINT
HINT:
- Use the same procedure for the RH side and LH side.
- The following procedure is for the LH side.
PROCEDURE
1. INSTALL LICENSE PLATE LIGHT ASSEMBLY
(a) Engage the 2 claws to install the license plate light assembly.
(b) Connect the connector.
2. INSTALL LUGGAGE COMPARTMENT DOOR OUTSIDE GARNISH SUB-ASSEMBLY
Click here .gif)
READ NEXT:
 Precaution
PRECAUTION PRECAUTION FOR DISCONNECTING CABLE FROM NEGATIVE BATTERY TERMINAL NOTICE: When disconnecting the cable from the negative (-) battery terminal, initialize the following systems after the cab
Parts Location
PARTS LOCATION ILLUSTRATION *1 PARK/NEUTRAL POSITION SWITCH ASSEMBLY *2 SIDE TURN SIGNAL LIGHT ASSEMBLY LH *3 SIDE TURN SIGNAL LIGHT ASSEMBLY RH *4 HEADLIGHT ASSEMBLY LH - HEADLIGH
SEE MORE:
Pressure Control Solenoid "C" Circuit Short to Battery (P079512)
DESCRIPTION Changing gears is performed by the ECM turning the solenoid (SL1, SL2, SL3, SL4, SL5 and SL6) valves on and off. If an open or short occurs in any of the solenoid valve circuits, the ECM controls the remaining normal solenoid valves to allow the vehicle to be driven. If all of the soleno
How To Proceed With Troubleshooting
CAUTION / NOTICE / HINT HINT:
Use the following procedure to troubleshoot the lighting system.
*: Use the Techstream.
PROCEDURE 1. VEHICLE BROUGHT TO WORKSHOP
NEXT 2. CUSTOMER PROBLEM ANALYSIS HINT:
In troubleshooting, confirm that the problem symptoms h
